
Welcome to the vibrant Flatiron and NoMad neighborhoods, a dynamic hub in the heart of Manhattan. Known for iconic landmarks like the Flatiron Building and Madison Square Park, these areas blend historic charm with modern energy. From trendy dining spots to cultural attractions, this district offers a unique blend of old-world luxury and contemporary innovation, making it a must-explore destination for both locals and visitors.

Neighborhood Overview

The Flatiron and NoMad neighborhoods, located in the heart of Manhattan, represent a harmonious blend of history and modernity. Situated north of Madison Square Park, NoMad (short for North of Madison Square Park) and the Flatiron District have evolved into two of New York City’s most dynamic and sophisticated areas. These neighborhoods are bounded by iconic landmarks such as the Flatiron Building, a symbol of Manhattan’s architectural ingenuity, and the Empire State Building, a timeless NYC staple.
Historically, the Flatiron District was a hub of commerce and innovation, while NoMad was once a residential enclave known for its elegant architecture. Today, both areas are thriving with a mix of stately hotels, upscale shopping, and cutting-edge businesses. The neighborhood’s central location makes it a hotspot for both locals and tourists, offering easy access to Midtown and downtown Manhattan.

Flatiron and NoMad are celebrated for their unique charm, characterized by tree-lined streets, historic brownstones, and bustling plazas. Madison Square Park, a green oasis in the midst of urban sprawl, serves as a focal point for community activities and public art installations. The area is also home to a vibrant cultural scene, with numerous galleries, performance spaces, and cultural events throughout the year.
Recent years have seen a surge in new businesses, from boutique hotels to trendy restaurants, injecting fresh energy into these historic neighborhoods. The Flatiron NoMad Partnership plays a key role in fostering a sense of community, organizing events and initiatives that celebrate the area’s heritage while embracing its modern identity. Whether you’re exploring iconic landmarks, enjoying outdoor activities, or soaking in the local culture, Flatiron and NoMad offer a quintessential New York City experience.

Places to Visit
Flatiron and NoMad offer a wealth of attractions that cater to all interests. The iconic Flatiron Building and Madison Square Park are must-visit landmarks. Explore public art installations, stroll through green spaces, or admire the architectural marvels. These neighborhoods are a perfect blend of history, culture, and modern vibrancy, ensuring endless opportunities for discovery and inspiration.
3.1 Landmarks
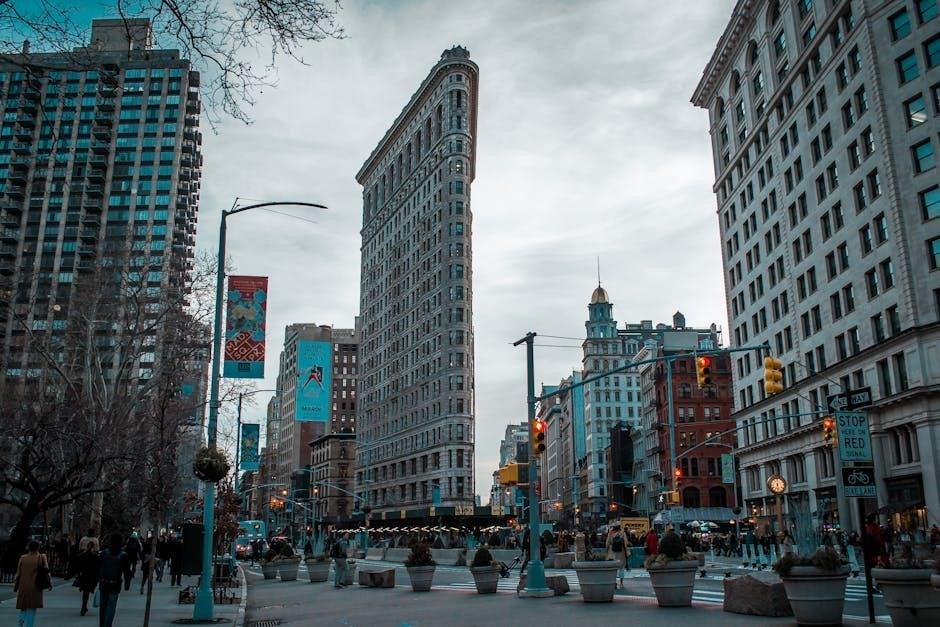
The Flatiron and NoMad neighborhoods are home to some of New York City’s most iconic landmarks, each offering a glimpse into the area’s rich history and architectural splendor. The Flatiron Building, with its distinctive triangular shape, is one of the most recognizable structures in Manhattan. Built in 1902, it stands as a symbol of the neighborhood’s namesake and attracts visitors from around the world. Nearby, Madison Square Park serves as a tranquil oasis, featuring beautiful greenery, public art installations, and plenty of seating areas to relax and enjoy the surroundings.
Another notable landmark is the Empire State Building, located just a short walk from the Flatiron District. While not directly in the neighborhood, its proximity and iconic status make it a must-visit attraction for anyone exploring the area. Additionally, the New York Public Library’s Stephen A. Schwarzman Building, with its stunning Beaux-Arts design, is another architectural gem worth exploring.
The area also boasts a mix of historic and modern landmarks, including the Flatiron North Plaza, a vibrant public space that hosts seasonal events and installations. Visitors can also explore the Jazz Gallery, a renowned performance venue in NoMad that showcases emerging and established jazz talent. These landmarks not only highlight the neighborhood’s cultural significance but also contribute to its dynamic and ever-evolving identity.
Whether you’re admiring the Flatiron Building’s unique design or strolling through Madison Square Park, the landmarks of Flatiron and NoMad offer a blend of history, culture, and urban charm that makes this area a standout destination in New York City; Be sure to check out the rotating public art installations and seasonal events that bring these landmarks to life throughout the year.
3.2 Parks and Green Spaces
Flatiron and NoMad are not just about iconic buildings and bustling streets; they also offer serene parks and green spaces that provide a peaceful escape from the city’s hustle and bustle. Madison Square Park, located at the heart of the Flatiron District, is one of the neighborhood’s crown jewels. This 6.2-acre park is a favorite among locals and visitors alike, offering a lush green oasis in the midst of Manhattan’s concrete landscape. The park features beautifully landscaped gardens, walking paths, and plenty of seating areas where you can relax and enjoy the surroundings.
Madison Square Park is also known for its rotating public art installations, which add a touch of culture and creativity to the space. The park’s central location makes it a popular spot for picnics, people-watching, and casual strolls. During the summer months, the park hosts various events and activities, including outdoor concerts and fitness classes, making it a vibrant community hub.
Beyond Madison Square Park, the Flatiron and NoMad neighborhoods offer several smaller green spaces and plazas that are perfect for a quick break or a peaceful moment. For example, the Flatiron North Plaza is a charming public space that often hosts seasonal events and installations. These areas not only enhance the beauty of the neighborhood but also provide a sense of community and tranquility in one of the city’s most dynamic areas.
In addition to these parks, the nearby Gramercy Park is another green space worth exploring, though access is limited to residents with keys. Its historic significance and picturesque surroundings make it a notable mention in the area’s green spaces. Overall, the parks and green spaces in Flatiron and NoMad offer a refreshing contrast to the urban environment, making them essential destinations for anyone looking to unwind and connect with nature in the heart of the city.
3.3 Public Art Installations
The Flatiron and NoMad neighborhoods are renowned for their vibrant public art installations, which add a creative and cultural dimension to the area. One of the most notable examples is the NYC Portal, a groundbreaking digital art installation located in the Flatiron North Plaza. Created by artist Anthony Gylys, this interactive portal connects New York City to other cities around the world, such as Dublin, allowing passersby to engage in real-time conversations with people in different global locations. This innovative project has become a symbol of connection and cultural exchange, drawing both locals and tourists to the area.
The NYC Portal is not just a work of art but also a reflection of the neighborhood’s commitment to fostering creativity and community engagement. Its temporary installation in Flatiron North Plaza was met with enthusiasm, and there are plans to make it a permanent fixture in the area. The portal’s presence has also highlighted the neighborhood’s role as a hub for innovative and interactive art, setting it apart from other Manhattan districts;
Beyond the NYC Portal, the area is home to various rotating public art installations, often displayed in Madison Square Park and other public spaces. These exhibits showcase the work of local and international artists, adding a dynamic and ever-changing aspect to the neighborhood’s landscape. Whether it’s a large-scale sculpture or a mural, these installations contribute to the area’s lively atmosphere and provide a unique cultural experience for visitors.
The integration of public art into the fabric of Flatiron and NoMad reflects the community’s appreciation for creativity and its desire to create a welcoming and inspiring environment. These installations not only beautify the area but also serve as a testament to the neighborhood’s vibrant spirit and its role as a cultural hub in Manhattan.
3.4 Iconic Buildings
The Flatiron and NoMad neighborhoods are home to some of Manhattan’s most iconic and architecturally significant buildings, making them a must-visit destination for history buffs and architecture enthusiasts. The Flatiron Building, located at the intersection of Fifth Avenue and Broadway, is perhaps the most recognizable landmark in the area. Completed in 1902, this triangular-shaped skyscraper stands 22 stories tall and is a masterpiece of Beaux-Arts architecture. Its unique design and historic significance have made it a symbol of New York City and a favorite among photographers and tourists alike.
Another iconic structure in the area is the Empire State Building, located just a short walk from Flatiron and NoMad. While technically part of Midtown, its proximity to the neighborhoods makes it a notable landmark for visitors exploring the area. Standing at 102 stories, this Art Deco skyscraper is one of the tallest buildings in the world and offers breathtaking views of the city from its observation decks. It’s a testament to the engineering and architectural prowess of the early 20th century.
The New York Life Building, located on Madison Avenue, is another architectural gem in the vicinity. Known for its striking golden pyramid topping its 40-story structure, this building is a blend of neo-Gothic and Art Deco styles. Completed in 1928, it has been a prominent feature of the Manhattan skyline for nearly a century and continues to inspire awe in those who visit the area.
These iconic buildings not only define the skyline of Flatiron and NoMad but also reflect the neighborhood’s rich history and cultural significance. They serve as a reminder of New York City’s enduring legacy as a hub of architectural innovation and design excellence.

Dining Scene
Flatiron and NoMad boast a vibrant culinary scene, offering a diverse array of dining experiences. From upscale restaurants serving gourmet cuisine to trendy eateries and casual cafes, the area caters to every palate. The neighborhood is a hotspot for food enthusiasts, blending classic New York flavors with international influences. Its dynamic dining options make it a must-visit destination for both locals and visitors seeking a memorable culinary adventure.
4.1 Restaurants
The Flatiron and NoMad neighborhoods are a culinary paradise, offering a diverse range of restaurants that cater to every taste and preference. From fine dining establishments to casual eateries, the area is packed with options that showcase the best of New York City’s food scene. One of the standout features of the dining scene here is the mix of historic charm and modern innovation, reflected in both the ambiance and the menus.

For those seeking a quintessential New York dining experience, the Flatiron District is home to iconic restaurants like the Gramercy Tavern, known for its farm-to-table American cuisine. Similarly, Maialino offers a sophisticated take on Italian dishes, while Bo’s Kitchen & Bar Room blends Southern and Asian flavors for a unique fusion experience. These restaurants not only provide exceptional food but also contribute to the neighborhood’s vibrant atmosphere.

NoMad, on the other hand, has become a hotspot for trendy dining spots. Restaurants like The NoMad at the NoMad Hotel are celebrated for their elegant interiors and creative menus. The area also boasts a variety of international cuisines, from French patisseries to Korean-inspired bakeries, ensuring that diners can explore flavors from around the world without leaving Manhattan.
What makes the dining scene in Flatiron and NoMad truly special is its ability to balance sophistication with approachability. Whether you’re in the mood for a romantic dinner at a Michelin-starred restaurant or a casual bite at a cozy bistro, there’s something here for everyone. The neighborhood’s central location and lively energy make it a favorite among both locals and visitors, solidifying its reputation as one of New York City’s top dining destinations.
4.2 Cafes and Bakeries
The Flatiron and NoMad neighborhoods are a haven for coffee lovers and those with a sweet tooth, boasting an array of charming cafes and bakeries that offer unique and delicious treats. These spots are not only perfect for a quick breakfast or afternoon pick-me-up but also serve as cozy retreats from the bustling city streets.
One of the standout destinations is a French-Korean bakery that has gained a loyal following for its inventive pastries. Blending traditional French techniques with Korean flavors, this bakery offers a truly one-of-a-kind experience. Another must-visit is a cozy café known as “FOR:,” which specializes in creative coffee blends and artisanal sandwiches, making it a favorite among locals and remote workers.
Bibble & Sip, a popular spot in the area, is celebrated for its signature milk tea and Asian-inspired desserts. Their “milk tea tres leches cake” is a crowd-pleaser, while their “toasted milk tea latte” is a must-try for any coffee enthusiast. For those seeking a more upscale experience, Patisserie Chanson offers an elegant atmosphere paired with exquisite French-inspired pastries and desserts. Their seasonal offerings are particularly noteworthy, showcasing the finest ingredients of each time of year.
Additionally, the neighborhood is home to a variety of boutique bakeries that cater to diverse tastes. From gluten-free options to vegan treats, there’s something for everyone. These cafes and bakeries not only provide exceptional food and drink but also contribute to the area’s vibrant and welcoming atmosphere, making them essential stops for any visitor or local exploring Flatiron and NoMad.
4.3 Bars and Nightlife
The Flatiron and NoMad neighborhoods offer a vibrant and diverse nightlife scene, catering to a wide range of tastes and preferences. From sleek cocktail bars to trendy lounges, these areas provide endless opportunities to unwind, socialize, and enjoy a memorable evening out in the heart of Manhattan.
One of the standout spots is the Flatiron Lounge, a chic bar known for its handcrafted cocktails and sophisticated ambiance. With a focus on seasonal ingredients, their drink menu changes regularly, ensuring there’s always something new to try. Another favorite is the bar at The NoMad Hotel, which offers an upscale setting with a menu of classic and innovative cocktails. Its elegant decor and intimate vibe make it a perfect spot for a nightcap or a special occasion.
For those seeking something more unique, the area is home to several hidden gems, such as Please Don’t Tell (PDT), a speakeasy-style bar tucked away behind a hotline in a hot dog shop. This secretive spot offers expertly mixed drinks in a cozy, exclusive setting. Additionally, The Raines Law Room is another must-visit, featuring a Prohibition-era vibe with its own entrance and a menu of carefully curated cocktails.
Beyond traditional bars, the neighborhood also boasts a variety of trendy spots that blend nightlife with live music and entertainment. Venues like The Jazz Gallery in NoMad provide a space for jazz enthusiasts to enjoy performances while sipping on a drink. These establishments reflect the area’s dynamic energy and its ability to cater to diverse interests.
Whether you’re looking for a relaxed evening with friends or an exciting night out, Flatiron and NoMad’s nightlife scene has something for everyone. Its mix of sophistication and approachability makes it a go-to destination for both locals and visitors alike.
4.4 Food Tours
Embark on a culinary adventure through the Flatiron and NoMad neighborhoods with one of the many guided food tours available. These tours offer a unique way to explore the area’s vibrant food scene, highlighting local eateries, hidden gems, and iconic dishes that define the district’s culinary identity.
One of the most popular options is the NYC Food Tour: NoMad and Flatiron, led by knowledgeable guides who take participants on a journey through the neighborhoods’ most beloved food spots. This 3-hour tour allows visitors to sample a variety of flavors, from artisanal pastries to gourmet cheeses, while learning about the history and culture behind each dish. With a focus on sustainability and community support, this tour is not only delicious but also socially conscious.
Another highlight is the Flatiron and Union Square Food Tour, which combines food, architecture, and history. Participants get to explore the iconic Flatiron Building, Madison Square Park, and Union Square while indulging in the area’s culinary delights. The tour includes stops at local cafes, bakeries, and restaurants, offering a taste of everything from classic New York dishes to innovative fusion cuisine.

These food tours are perfect for both locals and visitors looking to uncover the hidden gems of the Flatiron and NoMad neighborhoods. With expert guides leading the way, you’ll gain a deeper appreciation for the area’s rich history and its vibrant food culture. Whether you’re a foodie or just curious about the neighborhood, these tours are an unforgettable way to experience the best of what Flatiron and NoMad have to offer.