lost tempo manual

Welcome to the Lost Tempo Manual, your guide to mastering the Drum and Looper Effect Pedal. This manual provides comprehensive instructions for optimal use, customization, and troubleshooting, ensuring you unlock the full potential of this versatile audio workstation.

Overview of the Lost Tempo Drum and Looper Pedal

The Lost Tempo Drum and Looper Pedal is an advanced audio workstation designed for musicians seeking versatility in performance and practice. It combines a drum machine, looper, and tuner, offering 30 customizable drum styles, adjustable tempo, and real-time editing via its companion app. With intuitive controls and synchronization features, it enhances creativity and precision, making it an essential tool for modern musicians.

Purpose and Scope of the Manual

This manual serves as a detailed guide for the Lost Tempo Drum and Looper Pedal, providing step-by-step instructions for setup, operation, and customization. It covers drum mode, looper functions, synchronization, and troubleshooting, ensuring users can maximize the pedal’s features. The manual is designed for musicians of all levels, offering clear explanations and practical tips to enhance their musical experience with the Lost Tempo.

Key Features of the Lost Tempo

The Lost Tempo combines a drum machine and looper with customizable kits, adjustable tempo, and real-time editing via an app, offering versatile tools for musicians and producers.

Integrated Drum Machine and Looper

The Lost Tempo seamlessly combines a drum machine and looper, offering a powerful audio workstation. Musicians can easily switch between drum and looper modes, or use them together for layered sounds. The drum machine features 30 customizable kits and various time signatures, while the looper allows for recording, overdubbing, and syncing with drum patterns. This integration empowers creative performance and practice, making it an essential tool for live and studio use.

Customizable Drum Kits and Rhythms

The Lost Tempo offers extensive customization options for drum kits and rhythms. Users can edit and save custom drum patterns via the companion app, with real-time adjustments. It supports various time signatures like 4/4, 3/4, and 6/8, allowing for tailored rhythmic expressions. This flexibility makes it ideal for musicians seeking to personalize their sound and adapt to diverse musical genres and creative needs.

Tempo Adjustment and Sync Features

The Lost Tempo allows precise tempo adjustment, enabling musicians to fine-tune their rhythmic expressions. It features tap tempo functionality for real-time adjustments and seamless synchronization with loops. The pedal also supports external device syncing, ensuring harmony between connected gear. These features empower users to maintain consistent timing and enhance their live performances with effortless control over tempo and synchronization capabilities.

Setting Up the Lost Tempo

Setting up the Lost Tempo is straightforward. Connect the pedal, install the companion app, and sync your devices for seamless integration and enhanced musical performance.

Hardware Requirements and Connections

To set up the Lost Tempo, ensure you have a compatible power supply and MIDI interface. Connect the pedal to your audio interface or mixer using standard 1/4-inch cables. For MIDI syncing, use a MIDI-to-MIDI or MIDI-to-USB cable. The pedal also supports external footswitches for expanded control. Ensure all connections are secure to avoid signal loss. Refer to the companion app for firmware updates and optimal performance.

Downloading and Installing the Companion App

Download the Lost Tempo companion app from the official website or app stores. The app is available for both iOS and Android devices. Once installed, connect your pedal to the app via Bluetooth or MIDI for real-time customization. The app allows you to edit drum kits, adjust rhythms, and save custom patterns. Ensure your device meets the minimum system requirements for smooth operation. Refer to the app’s user guide for detailed installation and setup instructions.

Using the Drum Mode

Engage with the Drum Mode to explore 30 diverse drum styles and customize kits in real time via the app. Adjust tempo and timing with precision using the tap tempo feature for synchronized playback, enhancing your creative workflow and performance.

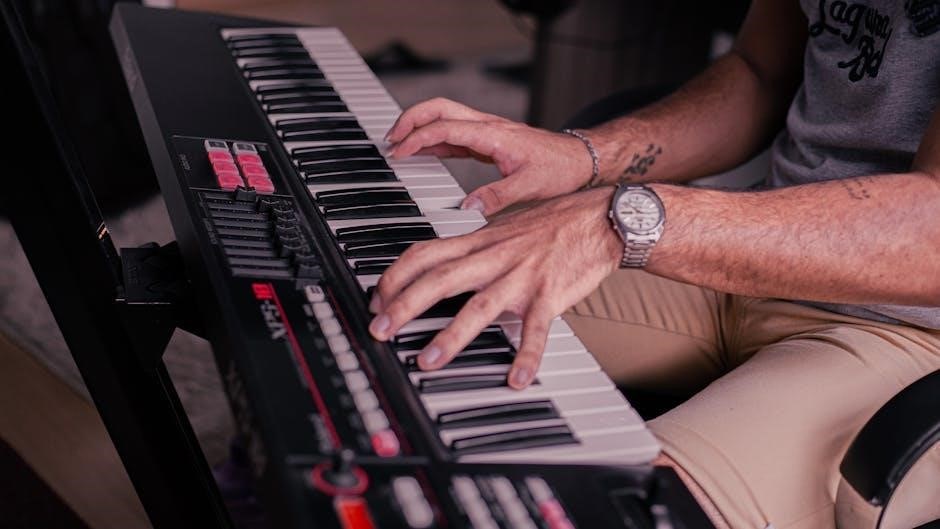
Navigating the Drum Module Interface

The Drum Module Interface offers intuitive controls for seamless operation. Use the DRUM knob to adjust volume and the status indicator to monitor playback. The footswitch allows tap tempo functionality, enabling precise timing adjustments. LEDs indicate modes: red for edit, green for saved states, and yellow for synchronization. Navigate through 30 drum styles and customize rhythms via the app for enhanced creativity and performance control.

Adjusting Tempo and Time Signatures

Adjusting tempo and time signatures on the Lost Tempo is straightforward. Use the tap tempo feature by tapping the footswitch to set the desired BPM. For precise adjustments, utilize the companion app to fine-tune tempo and switch between time signatures like 4/4, 3/4, or 6/8. LED indicators provide visual feedback, with flashing speeds indicating tempo. Synchronize tempo with loops for seamless performance and save settings for quick access during sessions. Adjustments can be made on the fly, ensuring a smooth creative process.

Editing and Saving Custom Drum Patterns

The Lost Tempo allows users to create and customize drum patterns with ease. Use the companion app to edit drum kits, adjust individual drum sounds, and modify rhythms in real-time. Patterns can be saved directly to the device or app for quick access during performances. The footswitch enables seamless navigation between edit and play modes, ensuring a smooth workflow. Custom patterns are stored internally, making it easy to recall your unique creations anytime, enhancing your musical expression.

Operating the Looper Mode

The Lost Tempo Looper Mode allows seamless recording, playing, and overdubbing of loops. LED indicators show loop status, and synchronization with drum patterns ensures precise timing. Users can manage loops with undo/redo and delete functions, while the companion app offers real-time control and organization of looped content for enhanced creativity and efficiency in live performances and practice sessions.

Recording, Playing, and Overdubbing Loops

The Lost Tempo Looper Mode enables intuitive loop creation. Press the footswitch to start recording, with LED indicators showing recording or playback status. Single tap to start/stop loops, while double tap stops playback without affecting the drum machine. Overdubbing allows layering sounds seamlessly. The companion app provides real-time control, enabling precise loop organization and customization. This feature-rich system is designed for both live performances and practice, offering musicians extensive creative flexibility and efficiency in loop management.

Synchronizing Loops with Drum Patterns

The Lost Tempo seamlessly synchronizes loops with drum patterns, ensuring precise timing. Engage synchronous recording by pressing the LOOP footswitch, with the status indicator flashing during recording. Once recorded, loops automatically sync with the drum machine’s rhythm. Use the tap tempo feature to adjust the drum speed, maintaining perfect alignment with your loops. This synchronization enhances live performances and practice sessions, allowing for a cohesive and professional sound integration between drum patterns and layered loops.

Undo/Redo and Delete Functions

The Lost Tempo offers intuitive undo/redo and delete functions. To undo or redo, hold the footswitch during recording or playback when the status indicator flashes red. This allows you to revert changes or restore previous recordings. To delete a loop, double-tap the footswitch while the LOOP status indicator is off, ensuring your tracks remain organized and tailored to your creative process.

Synchronization and Timing

The Lost Tempo ensures precise timing with its tap tempo feature and seamless synchronization with external devices, maintaining consistent rhythmic accuracy during live performances and recordings.

Using Tap Tempo for Precise Timing

Tap Tempo allows musicians to set the Lost Tempo to match their playing speed. By tapping the footswitch twice, the device adjusts to the desired tempo, ensuring synchronization. This feature is particularly useful during live performances, enabling real-time adjustments without interrupting the flow. It enhances rhythmic accuracy and provides a professional sound. Regular practice with a click track is recommended for optimal results.

Syncing with External Devices

The Lost Tempo supports synchronization with external devices via MIDI, ensuring seamless integration with other musical equipment. Connect the pedal to external gear using MIDI ports and set both devices to the same MIDI channel. This feature allows for precise tempo synchronization, enabling consistent timing across all connected devices. It enhances live performances and studio recordings by maintaining a unified rhythm.

Customization and Effects

The Lost Tempo offers extensive customization options through its companion app, allowing real-time editing of drum kits, rhythms, and effects. Enhance your sound with versatile effects tailored to both drum and looper tracks.

App-Based Customization Options

The Lost Tempo companion app enables real-time customization of drum kits, rhythms, and effects.
Users can edit and save custom drum patterns, adjust tempo, and fine-tune sounds.
The app also supports synchronization of custom settings across devices, ensuring seamless integration into your workflow.
With intuitive controls, musicians can tailor their sound to suit any genre or performance style, enhancing creativity and versatility in their music production.

Adding Effects to Drum and Looper Tracks

The Lost Tempo allows users to enhance their music by adding effects to both drum and looper tracks.
Through the companion app, musicians can apply reverb, delay, distortion, and other effects in real-time.
Effects can be customized and saved, ensuring consistency across performances.
The looper mode also supports layering effects during overdubbing, while drum tracks can be fine-tuned for depth and texture.
This feature-rich system enables artists to create complex, professional-sounding compositions with ease.

Maintenance and Troubleshooting

Regularly clean the Lost Tempo with a soft cloth and avoid moisture exposure. Update firmware via the app for optimal performance. Troubleshoot common issues like sync problems by resetting or checking connections.

Cleaning and Updating Firmware

Regularly clean the Lost Tempo with a soft, dry cloth to prevent dust buildup. Avoid harsh chemicals or moisture. For firmware updates, connect the pedal to your computer or mobile device via USB. Open the companion app, select the firmware update option, and follow on-screen instructions. Ensure a stable internet connection and do not disconnect the pedal during the update process to prevent damage.

Common Issues and Solutions

If the Lost Tempo fails to sync with external devices, reset the pedal by holding the Drum and Looper buttons for 5 seconds. For tempo inaccuracies, calibrate the Tap Tempo function in the app. If loops fail to record, ensure the USB is connected properly and restart the device. Refer to the manual for additional troubleshooting steps to resolve common operational issues effectively.

This concludes the Lost Tempo Manual. The pedal seamlessly integrates a drum machine and looper, offering versatile tools for musicians. For deeper insights, explore additional resources.

Best Practices for Optimal Use

For optimal use, read the manual thoroughly to unlock the Lost Tempo’s capabilities. Start with preset drum patterns before customizing. Use tap tempo for precise timing and sync loops with drum patterns for seamless performances. Regular firmware updates ensure stability and new features. Explore the companion app for extended customization, enhancing your musical creativity and workflow.

Resources for Further Learning

For deeper exploration, visit the official Lost Tempo website for detailed manuals, video tutorials, and FAQs. Explore community forums and YouTube channels for user-generated content and tips. The companion app offers in-app guides, while the manufacturer provides email support for technical queries. Additionally, check out instructional videos on basic operations in Drum and Looper modes to enhance your skills and troubleshooting abilities.

example of a lesson plan pdf

L lesson planning is a structured approach to organizing educational content, ensuring coherence and alignment with learning objectives. It guides instructors in delivering effective lessons, fostering student engagement and understanding. A well-designed lesson plan outlines the scope, sequence, and activities, providing a clear roadmap for teaching and learning. It also helps educators assess student progress and adapt instruction to meet diverse needs. Effective lesson planning is essential for creating meaningful learning experiences and achieving academic goals.

1.1 What is a Lesson Plan?

A lesson plan is a detailed outline that guides instructors in delivering educational content during a teaching session. It typically includes learning objectives, materials, procedures, and assessment methods. This structured document ensures coherence and alignment with educational goals, helping teachers organize their approach and manage classroom time effectively. A lesson plan serves as a flexible blueprint, allowing educators to adapt to student needs while maintaining focus on key outcomes. It is a essential tool for effective teaching and learning, providing clarity and direction for both instructors and students.

1.2 Importance of Lesson Planning in Education

L lesson planning is essential for ensuring educational content is delivered effectively. It helps teachers organize their approach, manage classroom time, and align activities with learning objectives. A well-structured plan ensures that students meet academic goals and develop necessary skills. It also allows educators to identify required resources and assess student progress. Lesson planning promotes consistency, clarity, and accountability in teaching, ultimately enhancing the quality of education. It is a cornerstone of successful instruction, enabling teachers to create engaging and meaningful learning experiences for their students.

Key Components of a Lesson Plan

A lesson plan typically includes clear objectives, materials, procedures, activities, and assessments. These components ensure structured delivery, alignment with goals, and effective evaluation of student learning outcomes.

2.1 Lesson Objectives and Learning Outcomes

Lesson objectives are specific, measurable goals that define what students should learn by the end of the lesson. Learning outcomes describe the skills or knowledge students will gain. These components ensure clarity, focus, and alignment with educational standards. Well-crafted objectives guide instruction, while outcomes help assess student achievement. For example, an objective might be “Identify and explain the main themes of a text,” while an outcome could be “Students will analyze themes using evidence.” Both are crucial for effective lesson design and evaluation.

2.2 Materials and Resources Needed

Materials and resources are essential for implementing a lesson effectively. They include textbooks, whiteboards, projectors, and digital tools like educational software or online platforms. Additional resources might involve handouts, worksheets, or multimedia content to enhance engagement. For technology-integrated lessons, tools like Google Classroom or Kahoot can facilitate interactive learning. Ensuring all necessary materials are available beforehand helps maintain the lesson’s flow and supports student participation. These resources also cater to diverse learning styles, making the lesson more inclusive and effective for all students.

2.3 Lesson Procedures and Activities

A well-structured lesson plan outlines clear procedures and activities to guide student learning. It begins with an introduction to engage students, followed by direct instruction, guided practice, and independent activities. Interactive elements like group discussions, hands-on tasks, or technology integration can enhance engagement. Each activity is timed and aligned with learning objectives, ensuring a logical flow. The lesson concludes with a summary and review to reinforce key concepts. These structured procedures help maintain focus, promote active participation, and maximize learning outcomes for all students.

2.4 Assessment and Evaluation Methods

Assessment and evaluation are crucial for measuring student understanding and achievement. A lesson plan typically includes formative assessments, such as quizzes or class discussions, to monitor progress during the lesson. Summative assessments, like homework or tests, evaluate learning at the end. Observations, participation, and peer reviews also provide valuable insights. Technology tools, such as online quizzes, can streamline assessment. The data collected helps teachers adjust instruction, identify areas for improvement, and ensure students meet the lesson’s objectives effectively.

Examples of Lesson Plans in Different Subjects

This section showcases diverse lesson plans across English, Mathematics, and Science. Each example provides a structured approach to teaching specific topics, ensuring clarity and effectiveness in the classroom.

3.1 English Language Lesson Plan Example

An English language lesson plan example focuses on teaching storytelling and moral values. The lesson begins with a story sequencing activity, followed by writing exercises. Students analyze characters and plot, then create their own stories. The plan includes pair work, class discussions, and sharing sessions. Learning objectives aim to enhance narrative skills and moral understanding. Assessment is through participation and written tasks. This structured approach ensures engagement and skill development, providing a comprehensive learning experience for students.

3.2 Mathematics Lesson Plan Example

A mathematics lesson plan example for 3rd-grade geometry focuses on identifying and measuring shapes. Activities include shape recognition, group work with real-life objects, and problem-solving exercises. Learning objectives aim to enhance shape identification and measurement skills. The lesson incorporates visual aids and hands-on activities to engage students. Assessment is through participation and accuracy in problem-solving tasks. This structured approach ensures students grasp foundational geometry concepts while developing critical thinking and collaboration skills.

3.3 Science Lesson Plan Example

A science lesson plan example for 5th-grade biology focuses on ecosystems and the water cycle. Learning objectives include defining ecosystems, understanding the water cycle, and explaining interactions between organisms. Activities involve a PowerPoint presentation, group research on ecosystem components, and a class discussion on conservation. Assessment includes a short quiz and evaluation of group presentations. This lesson integrates hands-on activities with theoretical knowledge, fostering critical thinking and environmental awareness. It aligns with curriculum standards and promotes collaborative learning.

Tips for Creating an Effective Lesson Plan

  • Ensure clarity in objectives and alignment with curriculum standards.
  • Incorporate engaging activities that cater to diverse learning styles.
  • Utilize technology to enhance instruction and student interaction.
  • Allow flexibility to adapt to student needs and pace.
  • Include assessment strategies to monitor progress and understanding.

4.1 Flexibility in Lesson Planning

Flexibility in lesson planning allows educators to adapt their instruction based on student responses and unexpected challenges. It ensures that lessons remain dynamic and responsive to classroom needs. Being flexible enables teachers to adjust the pace, activities, or content as necessary, fostering a more inclusive and effective learning environment. This approach also helps manage time constraints and accommodates different learning styles, making the lesson plan more robust and adaptable. Flexibility is key to meeting the diverse needs of students and achieving learning objectives effectively.

4.2 Aligning Activities with Learning Objectives

Aligning activities with learning objectives ensures that lessons are purposeful and focused. It guarantees that every task directly contributes to achieving the desired outcomes, maintaining coherence and structure. By clearly defining objectives, educators can design activities that cater to diverse learning styles, ensuring all students engage meaningfully. This alignment also facilitates assessment, as the success of activities can be measured against the stated goals. Proper alignment enhances the effectiveness of instruction, making lessons more impactful and relevant for students.

4.3 Using Technology in Lesson Planning

Integrating technology into lesson planning enhances efficiency and engagement. Tools like digital templates and interactive software allow educators to create dynamic, visually appealing plans. Technology also facilitates the incorporation of multimedia resources, such as videos and simulations, to enrich learning experiences. Additionally, online platforms enable real-time collaboration and feedback, making it easier to refine plans. By leveraging technology, teachers can personalize instruction, track student progress, and adapt lessons to meet diverse needs, ultimately improving the overall quality of education and student outcomes.

How to Use a Lesson Plan PDF Template

Download and fill in the template, customizing sections like objectives, materials, and activities. Tailor it for specific subjects or grade levels to ensure alignment with learning goals.

5.1 Benefits of Using a PDF Template

Using a lesson plan PDF template streamlines the planning process, saving time and ensuring consistency. It provides a structured format, making it easier to organize content and present it professionally. PDF templates are customizable, allowing educators to tailor them to specific subjects, grade levels, or teaching styles. They also promote clarity and alignment with learning objectives, ensuring all key components are included. Additionally, PDF templates are easily shareable and reusable, making collaboration and resource management more efficient for teachers.

5.2 Customizing the Template for Your Needs

Customizing a lesson plan PDF template allows educators to tailor it to their specific teaching requirements; Teachers can add or remove sections, such as materials, activities, or assessments, based on the lesson’s objectives. The template can be adapted for different subjects, grade levels, or classroom environments. For example, a math lesson might emphasize problem-solving activities, while an English lesson could focus on reading comprehension exercises. Customization ensures the template remains flexible and relevant, catering to diverse teaching styles and student needs while maintaining a structured framework for effective instruction.

Best Practices for Sharing and Implementing Lesson Plans

Effective sharing and implementation of lesson plans involve collaboration, clear communication, and adaptability. Teachers should align plans with curriculum goals, seek feedback, and remain open to improvements, ensuring successful execution and student engagement in the classroom.

6.1 Collaboration with Colleagues

Collaboration with colleagues enhances lesson planning by pooling ideas and resources. Teachers can share insights, refine strategies, and align methods to meet common goals. Regular meetings and feedback sessions foster a supportive environment, ensuring consistency and innovation in teaching approaches. By working together, educators create comprehensive and effective lesson plans that cater to diverse student needs, promoting a culture of professional growth and shared success in the educational community.

6.2 Feedback and Continuous Improvement

Feedback is crucial for refining lesson plans and teaching methods. Collecting input from students, peers, and self-assessment helps identify strengths and areas for improvement. Continuous improvement involves revising plans based on feedback, incorporating new strategies, and adjusting activities to better meet learning objectives. Regular reflection and adaptation ensure that lesson plans remain effective and relevant, fostering a dynamic approach to education that prioritizes student success and professional development.

A well-structured lesson plan enhances teaching efficiency and student learning. By outlining objectives, materials, and activities, it ensures coherence and alignment with educational goals, fostering success.

7.1 Summary of Key Points

L lesson planning is a vital tool for effective teaching, ensuring alignment with educational goals and fostering student engagement. Key components include clear objectives, organized materials, and structured procedures. Assessment methods validate learning outcomes, while flexibility adapts to student needs. Examples from various subjects demonstrate practical applications, showcasing how lesson plans can be tailored to diverse learning environments. Utilizing templates enhances consistency and efficiency, ultimately improving both teaching delivery and student learning outcomes. Adaptability and alignment with objectives are crucial for successful implementation.

clerks award pay guide 2023 pdf

The Clerks Award Pay Guide 2023 provides detailed information on pay rates, classifications, and employment conditions for clerical and secretarial roles under the Clerks ─ Private Sector Award 2020. It outlines minimum wages, allowances, and key changes in 2023, ensuring compliance with workplace standards. Employers and employees can access this guide to understand their rights and obligations, promoting fair compensation and equitable workplace practices.

Overview of the Clerks ─ Private Sector Award 2020

The Clerks ‒ Private Sector Award 2020 governs the employment conditions for clerical and secretarial staff in the private sector. It establishes minimum wages, classifications, and workplace entitlements, ensuring fair compensation and equitable treatment. This Award applies to a wide range of roles, including administrative, secretarial, and clerical positions, providing clarity on expectations for both employers and employees. It operates alongside the National Employment Standards (NES), offering a comprehensive framework for employment practices. The Award is regularly updated to reflect industry needs and workforce changes, making it a critical resource for understanding workplace rights and obligations in the private sector.

Key Changes in the 2023 Pay Rates

The 2023 pay rates under the Clerks Award introduced significant updates to ensure fair compensation for clerical and secretarial roles. Key changes include increased minimum wages, reflecting cost-of-living adjustments, and revised casual loading rates to align with industry standards. Additionally, there were adjustments to hourly and weekly pay calculations, providing clearer guidelines for employers. New provisions were also made for part-time employees, ensuring equitable payment structures. These updates aim to address wage disparities and promote transparency in remuneration. Employers are encouraged to refer to the Clerks Award Pay Guide 2023 to ensure compliance with the latest pay rate adjustments and maintain fair workplace practices.

Clerks Award Classifications

The Clerks Award Classifications outline the structure for clerical and secretarial roles, defining responsibilities and wages based on experience and job requirements, ensuring fair compensation.

Understanding Clerical and Secretarial Roles

Clerical and secretarial roles encompass a range of administrative and support functions essential for organizational operations. These positions often involve tasks such as data entry, scheduling, correspondence, and record-keeping. The Clerks Award Pay Guide 2023 categorizes these roles under the Clerks ‒ Private Sector Award 2020, ensuring fair compensation and clear job definitions. Clerical roles may vary from entry-level positions, such as junior clerks, to more advanced roles like senior secretaries or administrative officers. Understanding these roles is crucial for accurately applying pay rates and classifications, as outlined in the guide. This ensures compliance with workplace standards and supports equitable employment practices across industries.

Classification Levels and Definitions

The Clerks Award Pay Guide 2023 outlines specific classification levels for clerical and secretarial roles, ensuring clarity in job responsibilities and pay rates. These levels are defined under the Clerks ─ Private Sector Award 2020 and range from entry-level positions, such as Clerical Officer Grade 1, to more senior roles like Clerical Officer Grade 6. Each grade reflects increasing complexity, skill requirements, and accountability. For instance, Grade 1 involves basic administrative tasks, while higher grades may include supervisory duties or specialized expertise. These classifications help employers assign appropriate pay rates and ensure fair compensation aligned with job expectations. Accurate classification is essential for maintaining compliance with the Award and fostering equitable workplace practices.

2023 Pay Rates for Clerks

The Clerks Award 2023 sets structured pay rates for clerical roles, with rates varying by classification level. Full-time and casual employees receive specific hourly rates, ensuring fair compensation.

Full-Time and Casual Pay Rates

The Clerks Award Pay Guide 2023 outlines distinct pay rates for full-time and casual employees in clerical roles. Full-time employees are entitled to a base hourly rate, while casual workers receive a higher rate, inclusive of a 25% casual loading to account for the lack of leave entitlements. These rates are determined by the employee’s classification level, ensuring fair compensation based on job responsibilities. Employers must adhere to these rates to comply with the Clerks ─ Private Sector Award 2020. The guide also provides examples of hourly rates for different classifications, making it easier for employers to determine correct pay. This structure ensures transparency and equity in wage calculations.

Hourly and Weekly Wage Calculations

The Clerks Award Pay Guide 2023 provides clear formulas for calculating hourly and weekly wages for clerical employees. Hourly rates are determined by the employee’s classification level, with full-time workers entitled to a base rate, while casual employees receive an additional 25% loading. Weekly wages are calculated by multiplying the hourly rate by the number of hours worked in a standard workweek, typically 38 hours for full-time employees. The guide also outlines minimum weekly wages for each classification, ensuring employers can accurately compute pay. These calculations help prevent underpayment and ensure compliance with the Clerks ‒ Private Sector Award 2020. Employers can use these rates to determine correct pay for both full-time and casual staff.

Employment Conditions Under the Clerks Award

The Clerks Award Pay Guide 2023 outlines essential employment conditions, including minimum wages, working hours, and leave entitlements, ensuring fair treatment and compliance with workplace laws. It also covers provisions for part-time and casual workers, as well as allowances, to promote equitable workplace practices for all employees;

Part-Time and Casual Employment Specifics

Under the Clerks Award Pay Guide 2023, part-time employees must be rostered for a minimum of 3 consecutive hours per shift, ensuring predictable scheduling. Casual employees, however, work irregular hours without guaranteed shifts. Both types of employment are subject to specific conditions, such as casual loading rates to compensate for lack of leave entitlements. The guide also outlines minimum engagement periods to ensure fair compensation for all workers. Employers must adhere to these conditions to maintain compliance with the Clerks ─ Private Sector Award 2020. This section provides clarity on the distinctions between part-time and casual roles, helping employers and employees understand their rights and obligations effectively.

Minimum Weekly Wages and Allowances

The Clerks Award Pay Guide 2023 outlines the minimum weekly wages for clerical and secretarial roles, ensuring fair compensation across all classifications. Allowances are also specified, covering expenses such as first aid, internet use, and vehicle allowances. These rates are structured to reflect the responsibilities and requirements of each role. Casual employees receive a loading to compensate for benefits like annual leave and sick leave. Employers must ensure compliance with these wage and allowance standards to meet the requirements of the Clerks ‒ Private Sector Award 2020. This section provides clear guidelines to help employers and employees understand their entitlements and obligations effectively.

Gender-Based Undervaluation and Pay Equity

The 2023 Clerks Award Pay Guide addresses gender-based pay disparities in clerical roles, promoting equitable compensation. It ensures fair wages, tackling undervaluation of roles predominantly held by women, fostering workplace equality.

Addressing Pay Disparities in Clerical Roles

The Clerks Award Pay Guide 2023 emphasizes addressing pay disparities in clerical roles, particularly gender-based undervaluation. It ensures fair compensation by implementing equitable wage rates and allowances, reflecting the value of work regardless of gender. The guide aligns with the National Employment Standards (NES) to promote transparency and fairness in pay structures. Regular reviews and updates to the award help maintain parity and prevent wage discrimination. Employers are encouraged to adopt these measures to foster an inclusive workplace culture. This focus on pay equity supports the broader goal of achieving equal remuneration for equal work within the clerical sector.

Accessing the Clerks Award Pay Guide 2023 PDF

The Clerks Award Pay Guide 2023 PDF is available for download from official sources. Visit the designated website, register if required, and access the latest version for detailed pay rates, classifications, and employment conditions.

Where to Download the Latest Version

To access the Clerks Award Pay Guide 2023 PDF, visit the official website or trusted employment resources. Registration may be required to unlock detailed pay rates, classifications, and conditions. Ensure you download the latest version for accurate information. Reliable platforms provide easy navigation and secure downloads. Always verify the source to avoid outdated or incorrect data. The guide is essential for understanding current workplace standards and compliance requirements. By following these steps, you can obtain the most up-to-date version of the Clerks Award Pay Guide 2023 PDF for accurate reference and application.

Employers must adhere to the updated Clerks Award Pay Guide 2023 to ensure compliance with revised pay rates and classifications, maintaining fair workplace standards and legal obligations.

Compliance with the Clerks Award 2023

Compliance with the Clerks Award 2023 is essential for employers to avoid legal penalties and ensure fair workplace practices. The 2023 pay guide outlines minimum wages, allowances, and employment conditions, requiring employers to stay updated on all changes. Employers must implement the revised pay rates and classifications accurately, as non-compliance can lead to disputes and fines. Regular audits of payroll systems and employee records are recommended to verify adherence. Additionally, employers should consult the latest Clerks Award Pay Guide 2023 PDF to understand their obligations fully. Compliance ensures a smooth working relationship and maintains trust between employers and employees in the clerical sector.

faster way to fat loss plan pdf

The Faster Way to Fat Loss is a comprehensive program designed to optimize fat burning, boost metabolism, and improve overall health through strategic intermittent fasting, carb cycling, and macro tracking․

Overview of the Program

The Faster Way to Fat Loss is a structured program designed to help individuals achieve sustainable weight loss and improved health․ Created by fitness expert Amanda Tress, it combines intermittent fasting, carb cycling, and macro tracking to optimize fat burning and boost metabolism․ The program focuses on educating participants about nutrition, exercise, and lifestyle habits, empowering them to make informed decisions․ It emphasizes balanced eating, mindful portion control, and regular physical activity․ Unlike fad diets, this plan promotes long-term results by fostering healthier habits and a positive relationship with food․ With a clinically proven approach, it helps participants lose fat, build lean muscle, and enhance overall well-being in just six weeks․

Benefits of the Faster Way to Fat Loss

The Faster Way to Fat Loss offers numerous benefits, including rapid fat loss, improved metabolic function, and increased energy levels․ Participants often experience a significant reduction in body fat while maintaining or even gaining lean muscle mass․ The program promotes sustainable results by teaching healthy eating habits and lifestyle changes rather than relying on restrictive dieting․ It also helps regulate hunger hormones, reducing cravings and making it easier to stick to the plan․ Additionally, the program is designed to improve overall health, with many participants reporting better digestion, clearer skin, and enhanced mental clarity․ The structured approach ensures accountability and motivation, leading to long-term success and confidence․

Core Principles of the Faster Way to Fat Loss

The program relies on intermittent fasting, carb cycling, and macro tracking to optimize fat burning, enhance metabolism, and promote sustainable weight loss while preserving lean muscle․

Intermittent Fasting and Its Role in Fat Burning

Intermittent fasting is a cornerstone of the Faster Way to Fat Loss, helping the body shift from using glucose to burning stored fat for energy․ By restricting eating windows, it depletes glycogen stores, triggering fat metabolism․ This method also lowers insulin levels, enhancing fat breakdown․ Many participants report increased energy and mental clarity as their bodies adapt․ The program’s structured fasting periods ensure a balanced approach, preventing extreme hunger while maximizing fat-burning potential․ This strategy, combined with proper nutrition, accelerates weight loss and supports overall metabolic health, making it a key component of the program’s success․

Carb Cycling for Optimal Weight Loss

Carb cycling is a strategic approach within the Faster Way to Fat Loss, alternating carbohydrate intake to maximize fat burning while maintaining muscle․ By varying carb consumption, the body efficiently uses stored glycogen and shifts to fat metabolism․ Lower-carb days focus on fat loss, while higher-carb days support workouts and recovery․ This method prevents plateaus, keeps metabolism active, and aligns with individual goals․ The program guides users on timing carbs around workouts and balancing protein intake, ensuring sustained energy and progress․ Carb cycling, combined with intermittent fasting, creates a powerful synergy, enhancing weight loss and overall metabolic function for lasting results․

Macro Tracking and Balanced Nutrition

Macro tracking is a cornerstone of the Faster Way to Fat Loss, emphasizing the importance of balancing carbohydrates, proteins, and fats to fuel the body optimally․ By monitoring macronutrient intake, individuals can create a calorie deficit while maintaining muscle mass and energy levels․ The program encourages tailored nutrition plans, ensuring adequate protein for muscle preservation, carbohydrates for energy, and healthy fats for hormone function․ This approach avoids restrictive dieting, promoting sustainable weight loss and improved overall health․ The focus on balanced nutrition ensures that participants meet their dietary needs while supporting fat burning and metabolic function, making it easier to adhere to the program long-term․

How the Program Works

The Faster Way to Fat Loss combines intermittent fasting, carb cycling, and macro tracking to optimize fat burning and metabolism, with customizable phases for individual goals and needs․

Phases of the Faster Way to Fat Loss

The program is structured into distinct phases, each tailored to specific goals․ The first phase focuses on resetting metabolism and initiating fat loss through intermittent fasting and carb cycling․ The second phase introduces macro tracking to maintain momentum and enhance results․ Each phase is designed to gradually increase intensity, ensuring sustainable progress without burnout․ Participants receive guided support to transition smoothly between phases, adapting strategies as their body changes․ This structured approach ensures a balanced and effective journey toward fat loss and improved health outcomes, making the program adaptable to various fitness levels and objectives․

Customizing the Plan for Individual Needs

The Faster Way to Fat Loss is highly adaptable, allowing participants to tailor the program to their unique goals, body types, and lifestyles․ The plan begins with an assessment to determine individual needs, ensuring a personalized approach․ Macro tracking is adjusted based on specific objectives, such as fat loss or muscle gain, and meal plans are designed to accommodate dietary preferences and restrictions․ The program also offers flexibility in exercise routines, catering to varying fitness levels․ This customization ensures that participants can maintain consistency while addressing their personal health and wellness goals effectively․ The structured yet adaptable design makes it suitable for a wide range of individuals seeking sustainable fat loss and improved overall health․

Scientifically Backed Strategies

The program leverages insulin control and metabolic optimization to enhance fat burning, supported by research on intermittent fasting and carb cycling for sustainable weight loss․

The Science of Insulin Control for Fat Loss

Insulin control is central to the Faster Way to Fat Loss, as high insulin levels block fat burning․ By managing carb intake and timing through carb cycling, the program lowers insulin spikes, allowing the body to access stored fat for energy․ Intermittent fasting further enhances this process by prolonging periods of low insulin, promoting a metabolic shift toward fat utilization․ This approach is scientifically supported, as research shows that insulin regulation is key to sustainable weight loss and improved metabolic health․ The program’s strategies are designed to optimize insulin function, making fat loss more efficient and maintaining long-term results․

Boosting Metabolism Through Diet and Exercise

The Faster Way to Fat Loss emphasizes metabolism-boosting strategies, combining a balanced diet with targeted exercise․ By incorporating strength training, the program helps build lean muscle, which naturally increases resting metabolic rate․ The diet focuses on nutrient-dense foods, avoiding high-sugar and high-fat items that can slow metabolism․ Intermittent fasting and carb cycling also play roles, as they enhance the body’s fat-burning efficiency and prevent metabolic plateaus․ Regular physical activity, particularly high-intensity interval training (HIIT), further accelerates calorie burn․ This dual approach of diet and exercise ensures sustained metabolic improvements, making it easier to maintain weight loss over time and achieve a healthier, more energetic lifestyle․

Success Stories and Testimonials

Participants share inspiring journeys, with many losing significant inches and pounds, achieving improved health, and adopting sustainable lifestyle habits through the Faster Way program․

Real-Life Results from Participants

The Faster Way to Fat Loss program has transformed lives, with participants achieving significant fat loss and improved health․ Many share stories of losing 10-15 pounds in six weeks, emphasizing sustainable lifestyle changes․ Testimonials highlight increased energy, reduced bloating, and improved mental clarity․ Individuals praise the structured approach, combining intermittent fasting, carb cycling, and macro tracking․ The program’s flexibility allows customization, making it accessible for various fitness levels․ Participants often report feeling empowered, as they learn to fuel their bodies effectively․ The community support and expert guidance further enhance the experience, helping users maintain their results long-term․ These real-life transformations demonstrate the program’s effectiveness in promoting lasting fat loss and overall wellness․

Before and After Transformations

Participants in the Faster Way to Fat Loss program often share remarkable before-and-after stories, showcasing significant fat loss and improved body composition․ Many report losing 6-8 inches and 10-15 pounds within the first six weeks․ These transformations are not just physical; they also highlight mental and emotional shifts, such as increased confidence and energy․ The program’s structured approach to intermittent fasting, carb cycling, and macro tracking helps individuals achieve sustainable results․ Visual testimonials reveal toned bodies, reduced bloating, and a healthier overall appearance․ These dramatic changes inspire others to adopt the program, proving that consistent effort and the right strategies can lead to life-changing outcomes․ The before-and-after transformations are a testament to the program’s effectiveness in helping people achieve their fat loss goals and maintain long-term health․

Frequently Asked Questions

Common questions include suitability for all body types, diet strictness, and combining with other workouts․ The program is adaptable, promoting sustainable fat loss and overall wellness․

Is the Program Suitable for All Body Types?

The Faster Way to Fat Loss is designed to accommodate various body types and lifestyles, offering personalized approaches to optimize fat burning and overall health․ This adaptability ensures that individuals with different goals and physiological needs can benefit from the program․ By incorporating intermittent fasting, carb cycling, and macro tracking, it caters to diverse body compositions and fitness levels․ The program’s flexibility allows it to be tailored to suit different metabolic rates and dietary preferences, making it accessible to a wide range of participants seeking sustainable weight loss and improved well-being․ Its comprehensive structure ensures that it remains effective regardless of individual differences in body type or starting fitness levels․

Do I Need to Follow a Strict Diet?

While the Faster Way to Fat Loss emphasizes healthy eating, it doesn’t require a strict, overly restrictive diet․ The program focuses on balanced nutrition, encouraging whole foods, and mindful portion control․ It promotes sustainable lifestyle changes rather than extreme dieting․ By incorporating intermittent fasting and carb cycling, participants can enjoy flexibility in their food choices while still achieving fat loss․ The program allows for occasional indulgences and adapts to individual preferences, making it easier to maintain long-term․ This approach ensures that nutrition is both effective for weight loss and enjoyable, fostering a healthier relationship with food without the need for rigid dietary rules or deprivation․

Can I Combine the Program with Other Workout Routines?

The Faster Way to Fat Loss is designed to complement various workout routines, allowing participants to incorporate their preferred exercises․ Whether you enjoy strength training, cardio, or yoga, the program’s flexible structure supports your fitness goals․ It focuses on optimizing fat burning through nutrition and intermittent fasting, which can enhance the results of your workouts․ Many users combine the program with other routines to accelerate progress, but it’s important to ensure overall balance and avoid overtraining․ The program’s adaptability makes it suitable for different fitness levels and preferences, enabling you to tailor your approach while maintaining consistency with the core principles of fat loss and metabolic health․

The Faster Way to Fat Loss plan offers a structured and effective approach to achieving sustainable weight loss and improving overall health․ By combining intermittent fasting, carb cycling, and macro tracking, the program helps participants optimize fat burning and boost metabolism․ Its flexibility allows individuals to tailor the plan to their lifestyle and goals, making it a practical choice for long-term success․ With a focus on balanced nutrition and metabolic health, the program has empowered many to achieve significant transformations․ Real-life results and testimonials highlight its effectiveness, making it a trusted option for those seeking a comprehensive fat loss strategy․

uno trophy guide

Welcome to the comprehensive UNO Trophy Guide! This guide will help you unlock all 13 trophies, including 9 bronze, 3 silver, and 1 gold, in this classic card game.

Bronze Trophies

Earn your first trio of bronze trophies in UNO by completing initial milestones. Unlock Welcome by finishing your first game, A Good Start by winning your first match, and Be Heard by calling UNO ten times. These trophies provide a solid foundation for your journey to the platinum trophy.

2.1. Welcome

The Welcome trophy is your first milestone in the UNO Trophy Guide, marking your introduction to the game. To unlock this bronze trophy, simply complete your first UNO round. This trophy is unmissable and serves as a warm-up to get you familiar with the gameplay mechanics and controls. Once you finish your first game, the trophy will automatically pop, signaling the start of your journey toward the platinum. This is a straightforward achievement that requires no special strategy—just play through the initial round and enjoy the experience. It’s the perfect way to ease into the world of UNO and set the stage for the challenges ahead.

2.2. A Good Start

The A Good Start trophy is the next step in your UNO Trophy Guide journey, rewarding you for winning your first UNO game. This bronze trophy is a natural progression after completing the initial round and is a great way to build momentum. To achieve this, focus on matching colors or numbers, and strategically use action cards like Reverse, Skip, or Wild cards to disrupt your opponents. Remember to call “UNO” when you have one card left to avoid drawing additional cards. This trophy is a solid foundation for your UNO achievements and sets you up for more challenging trophies ahead. Keep practicing, and you’ll be well on your way to becoming a UNO champion!

2.3; Be Heard

The Be Heard trophy is awarded for successfully calling “UNO” 10 times. This bronze trophy is a fun way to engage with the game’s mechanics and encourages strategic play. To unlock it, you must verbally or visually indicate when you have only one card left in your hand. Timing is crucial, as calling “UNO” too early or too late can result in penalties. Consistently paying attention to your card count and communicating effectively will help you achieve this trophy. It’s a great way to practice awareness and reflexes, as you’ll need to act quickly when your hand is almost empty. This trophy is a stepping stone toward mastering the game and unlocking more advanced achievements. Keep your focus sharp, and you’ll be heard loud and clear in no time!

Silver Trophies

The silver trophies include Flying High for winning with over 700 points and Wild Draw Four Challenges for securing 20 victories using Wild Draw Four cards strategically.

3.1. Flying High

The Flying High trophy is a silver achievement that requires you to win a game with a score of over 700 points. This trophy is challenging but achievable with the right strategy. To maximize your points, focus on playing high-value cards like Wild Draw Four and Wild cards, as they award 20 points each. Additionally, using Action Cards strategically can help you control the game flow and minimize opponents’ scoring opportunities. Consistency is key; ensure you empty your hand quickly while forcing opponents to draw cards. Playing against AI on higher difficulty can also help you accumulate points faster. With practice and smart card usage, you can surpass the 700-point threshold and unlock this trophy.

3.2. Wild Draw Four Challenges

The Wild Draw Four Challenges trophy is a silver achievement that requires you to successfully win 20 Wild Draw Four challenges. This trophy tests your ability to strategically use one of UNO’s most powerful cards. To unlock it, focus on playing Wild Draw Four cards whenever possible, especially in situations where opponents are less likely to challenge them. Challenges occur when another player suspects you don’t have the correct color and forces you to draw four cards as a penalty. To maximize your success, use Wild Draw Four cards when opponents have fewer options or when they are likely to run out of moves. Consistency and patience are key, as this trophy may take multiple playthroughs to achieve. With strategic play, you’ll unlock this trophy and move closer to your platinum goal.

Gold Trophy

The Collector trophy is the ultimate achievement, requiring you to unlock all other UNO trophies. This gold trophy symbolizes your dedication and mastery of the game, rewarding your hard work.

4;1. Collector

The Collector trophy is the ultimate achievement in UNO, rewarding players for unlocking all other trophies in the game. This gold trophy signifies your complete mastery and dedication to the game. To earn it, you must achieve every bronze, silver, and gold trophy, showcasing your skills in various aspects of UNO. Whether it’s winning games, successfully calling UNO, or conquering challenges, this trophy is the final milestone in your journey. It requires persistence and a thorough understanding of the game mechanics. Once unlocked, it reflects your status as a true UNO champion, having explored all facets of the game. This trophy is a celebration of your hard work and commitment to becoming the best UNO player possible.

General Tips and Tricks

Mastering UNO requires a combination of strategy and quick thinking. Always pay attention to the cards in the discard pile to anticipate your opponents’ moves. Using action cards like Wild Draw Four and Reverse wisely can turn the game in your favor. Try to keep a balanced hand with a mix of colors and actions to stay flexible. If you have multiple cards of the same color, play them sequentially to deplete your hand faster. Calling “UNO” as soon as you have one card left is crucial to avoid drawing additional cards. Practice timing your plays to disrupt opponents’ strategies. Playing defensively by forcing opponents to draw cards can give you an edge. Lastly, stay observant and adapt your strategy based on the cards that have been played. These tips will help you dominate your opponents and unlock trophies efficiently.

Maximizing Points and Efficient Playthroughs

To maximize points and complete playthroughs efficiently, focus on ending games quickly by depleting your hand fast. Prioritize playing high-value cards like Wild Draw Four and Wild to earn more points; Aim to win multiple rounds in a single playthrough to accumulate points rapidly. For trophies like “Flying High,” target games where you can score over 700 points by strategically using action cards to extend your lead. Complete specific challenges, such as winning 20 Wild Draw Four challenges, in dedicated playthroughs to save time. Minimize unnecessary card draws by calling “UNO” promptly and avoid penalties. Play against AI opponents to practice and optimize your strategies without competition. By focusing on these methods, you can unlock trophies faster and achieve 100% completion efficiently. Keep track of your progress and adjust your approach as needed to ensure a smooth path to earning all trophies.

Completing the UNO Trophy Guide is achievable with persistence and strategy. By following the outlined steps and tips, you can unlock all 13 trophies, including the challenging Collector trophy. Patience is key, especially for tricky achievements like “Flying High” and “Wild Draw Four Challenges.” Utilizing AI opponents for practice and focusing on high-value cards will streamline your progress. Remember to call “UNO” promptly and avoid penalties to maximize efficiency. With dedication, you’ll join the ranks of ultimate UNO champions, earning bragging rights and the prestigious platinum trophy. Celebrate your mastery of this beloved classic and enjoy the satisfaction of 100% completion. Happy gaming!

craftsman gdo manual

The manual provides essential guidance for safe installation, operation, and maintenance of your Craftsman GDO. It includes safety precautions, product features, and warranty details for optimal functionality.

1.1 Overview of the Manual’s Purpose and Structure

This manual is designed to guide users through the safe and effective use of their Craftsman Garage Door Opener (GDO). It is structured to cover essential topics, from installation and operation to maintenance and troubleshooting. The manual emphasizes safety precautions, product features, and warranty information, ensuring users understand proper usage and compliance with regulations like UL 325. Its organized format makes it easy to navigate and reference key information for optimal functionality and longevity.

1.2 Importance of Reading the Manual Before Use

Reading the manual ensures safe and proper installation, operation, and maintenance of your Craftsman GDO. It highlights critical safety precautions, compliance with UL 325 regulations, and essential warranty details. Understanding the manual prevents accidents, optimizes performance, and extends the product’s lifespan. Familiarizing yourself with its contents is crucial before first use to avoid potential hazards and ensure compliance with safety standards and manufacturer recommendations.

Safety Guidelines and Precautions

Adhering to safety guidelines is crucial for safe installation and operation. Follow UL 325 standards, disable locks before installation, and ensure proper voltage to prevent malfunctions and ensure longevity.

2.1 General Safety Rules for Installation and Operation

Adhering to safety rules is essential for secure installation and operation. Ensure compliance with UL 325 standards, disable locks before installation, and verify proper voltage settings. Always maintain a balanced garage door and avoid operating the opener with an unbalanced door. Follow all warnings and instructions carefully to prevent accidents and ensure longevity of the garage door opener system.

2.2 Understanding Safety Symbols and Warnings

The manual uses safety symbols and signal words to alert users to potential hazards. Symbols like the warning triangle and exclamation mark indicate caution, while words like CAUTION and WARNING draw attention to specific risks. Always read and understand these symbols before proceeding with installation or operation. Compliance with UL 325 regulations ensures safety standards are met. Heed all warnings to avoid accidents and ensure proper functionality of the garage door opener.

2.3 Compliance with UL 325 Regulations

The Craftsman GDO is designed to comply with UL 325 standards for garage door openers, ensuring safe operation and reliability. These regulations, effective January 1, 1993, mandate specific safety features and testing protocols. Proper installation, maintenance, and adherence to the manual’s instructions are required to maintain compliance. This ensures the opener functions safely and meets industry standards for user protection and performance.

Installation Instructions

The manual provides a detailed, step-by-step guide for installing the Craftsman GDO, including tools needed and proper procedures to ensure safe and functional operation.

3.1 Tools and Materials Needed for Installation

Ensure you have a drill, screwdrivers, wrenches, and a ladder for installation. Additional materials include lag screws, brackets, and safety cables. Refer to the manual for specific tools and hardware required for your model. Proper preparation ensures a safe and efficient installation process. Always follow the manual’s guidelines to comply with safety standards like UL 325 regulations for optimal functionality and security.

3.2 Step-by-Step Installation Process

Begin by assembling the rail and attaching the motor unit. Secure the mounting brackets to the ceiling and garage door frame. Connect the chain or belt to the door and motor, ensuring proper alignment. Install safety sensors and test the opener to ensure smooth operation. Follow the manual’s detailed instructions for precise steps and safety compliance. Always disconnect power before adjusting or servicing the unit.

3.3 Balancing the Garage Door for Proper Functionality

Ensure the garage door is properly balanced to avoid strain on the opener. Disconnect power and test door weight by lifting it manually. A balanced door should stay in place when halfway open. If uneven, adjust springs or consult a professional. Proper balancing ensures smooth operation, prevents motor overload, and enhances safety. Refer to the manual for specific adjustment instructions.

Product Features and Specifications

The Craftsman GDO features a powerful motor for smooth operation, compatibility with various garage door types, and advanced features like wireless keypads and smart home integration for enhanced convenience.

4.1 Motor Power and Performance

The Craftsman GDO features a powerful motor designed for smooth and quiet operation, ensuring reliable performance. It is compatible with both single and double garage doors, providing consistent functionality. The motor’s robust design ensures durability and efficient operation, meeting UL 325 regulations for safety and performance. This makes it suitable for residential use, offering a balance of power and quietness for everyday convenience.

4.2 Compatibility with Different Garage Door Types

The Craftsman GDO is designed to work seamlessly with various garage door types, including sectional and one-piece doors. It is compatible with doors made of steel, wood, and vinyl, ensuring versatility for different residential setups. The opener supports doors of varying weights and sizes, up to 7 feet in height, making it a flexible solution for diverse garage door configurations and homeowner needs.

4.3 Additional Features like Wireless Keypad and Smart Home Integration

The Craftsman GDO offers a wireless keypad for external access without needing a remote. It is compatible with garage door openers manufactured since 1993. Additionally, smart home integration allows control through your smartphone, providing real-time notifications and seamless operation. This feature enhances convenience and security, ensuring you can monitor and manage your garage door from anywhere. Compatibility with systems like MyQ adds to its modern functionality.

Maintenance and Troubleshooting

Regular lubrication of moving parts and checking door balance ensures smooth operation. Troubleshooting common issues like uneven door movement or motor noise is also covered in detail.

5.1 Regular Maintenance Tips for Longevity

Regular maintenance ensures optimal performance and extends the lifespan of your Craftsman GDO. Lubricate moving parts annually, check door balance, and inspect safety sensors. Ensure proper installation, perform routine inspections of rails and cables, and clean debris from tracks. Follow manufacturer guidelines for lubrication and adjustments. Regularly test safety features and address minor issues promptly to prevent major repairs. Adhering to these tips ensures smooth, reliable, and long-lasting operation of your garage door opener.

5.2 Common Issues and Their Solutions

Common issues with Craftsman GDOs include misaligned safety sensors, worn-out belts, and faulty remote controls. To resolve these, ensure sensors are properly aligned, replace worn parts, and check remote batteries. For unbalanced doors, adjust springs or consult a professional. Regularly test safety features and clean tracks to prevent malfunctions. Addressing these issues promptly ensures smooth operation and extends the opener’s lifespan. Always refer to the manual for detailed troubleshooting steps.

Warranty Information

Craftsman GDOs are backed by a 90-day warranty covering defects in material and workmanship. Sears offers repair services for defects during this period, ensuring reliable support for customers.

6.1 Sears Warranty Details

The Sears warranty for Craftsman GDOs provides a 90-day coverage for defects in materials and workmanship. This ensures repairs or replacements are handled promptly during the warranty period.

The warranty is valid from the purchase date and applies to all components, offering customers peace of mind and reliable service from Sears.

6.2 Service and Repair Options

Craftsman GDOs offer comprehensive service and repair options through Sears. Customers can access authorized service providers for professional repairs, ensuring compliance with warranty terms.

Sears Parts Direct provides genuine replacement parts for DIY fixes, while customer support is available for troubleshooting and assistance. This ensures seamless maintenance and repair experiences for users.

Accessories and Compatibility

The Craftsman GDO supports wireless keypads and smart home integration for enhanced convenience. It is compatible with various Craftsman products and garage door types. Sears Parts Direct offers genuine accessories.

7.1 Recommended Accessories for Enhanced Functionality

For enhanced functionality, consider Sears Parts Direct for genuine Craftsman accessories. The wireless keypad (CMXZDCG440) offers convenient outside access, while smart home integration enables remote control. Compatible with Craftsman garage door openers, these accessories improve convenience and security, ensuring seamless operation with various garage door types. Explore the full range of recommended products to maximize your garage door opener’s performance and versatility.

7.2 Compatibility with Other Craftsman Products

Craftsman garage door openers are designed to work seamlessly with other Craftsman products, including wireless keypads and smart home systems. Accessories like the CMXZDCG440 wireless keypad and MyQ smart technology ensure compatibility with Craftsman GDO models. Sears Parts Direct offers genuine replacement parts and accessories, ensuring optimal performance. This compatibility enhances functionality, providing a cohesive and integrated garage door system for improved convenience and security.

Additional Resources

Find the full manual online at Sears Parts Direct or Manua.ls. Visit Craftsman’s official website for customer support, additional guides, and troubleshooting assistance.

8.1 Where to Find the Full Manual Online

The full manual for your Craftsman GDO can be downloaded from trusted sources like Sears Parts Direct or Manua.ls. Visit these websites, enter your model number in the search box, and access the PDF version. Additionally, Craftsman’s official website offers direct links to manuals, ensuring you have all the necessary information for installation, operation, and troubleshooting. Always verify the model number for accuracy before downloading.

8.2 Customer Support and Contact Information

For assistance with your Craftsman GDO, contact customer support at 1-800-4MY-HOME or via email at customer.service@craftsman.com. Support is available Monday through Friday, 8 AM to 8 PM EST. Visit the official Craftsman website for additional resources, including FAQs and troubleshooting guides; Ensure you have your model number ready for efficient support.

urgent care doctors note pdf free

An urgent care doctor’s note PDF is a convenient, customizable document
providing proof of a medical visit. It simplifies work or school absences
and offers a professional, efficient way to manage health-related documentation.

Importance of Doctors Notes in Urgent Care

A doctor’s note is crucial for verifying medical visits and validating absences from work or school. It serves as official proof of a patient’s condition, ensuring employers or educators understand the necessity of the absence. Urgent care notes are particularly valuable for minor injuries or illnesses, providing clear documentation of treatment and recovery timelines. They also help maintain professionalism and accountability, ensuring that absences are legitimate and justified. Additionally, these notes often include details about diagnoses, treatments, and follow-up care, making them essential for continuity of care. Their authenticity and clarity are vital for balancing patient privacy with the need for transparent communication.

Overview of Free PDF Templates for Doctors Notes

Free PDF templates for doctors’ notes offer a practical solution for documenting medical visits efficiently. These templates are designed to provide a structured format, ensuring all necessary details are included. They are readily available online, often customizable to suit specific needs, such as work or school excused absences. Many templates include sections for patient information, visit details, diagnoses, and treatment plans. Websites like PDFfiller and Carepatron provide reliable options, allowing users to download and edit templates quickly. These templates are ideal for urgent care settings, where time is of the essence, and provide a professional, polished appearance without the need for extensive formatting.

What is an Urgent Care Doctors Note?

An urgent care doctor’s note is official documentation confirming a patient’s visit to an urgent care clinic, typically used to validate work or school absences.

Definition and Purpose

An urgent care doctor’s note is official documentation confirming a patient’s visit to an urgent care clinic. It serves as proof of a legitimate medical consultation, detailing the date, time,
and nature of the visit. The purpose is to validate work or school absences, ensuring employers or educators are informed of the medical circumstances. This note typically includes the patient’s name, date of birth, visit details, and a brief description of the medical issue. It may also outline recommended rest periods or follow-up care. The document is essential for maintaining professional and academic obligations while addressing health concerns.

Key Components of an Urgent Care Doctors Note

A typical urgent care doctor’s note includes essential details such as the patient’s full name, date of birth, and contact information. It also contains the date and time of the visit,
a brief description of the medical issue, and the physician’s name and credentials. The note may specify the recommended period of rest or recovery,
along with any follow-up instructions. Additionally, it often includes the clinic’s name, address, and contact details for verification purposes. These components ensure the document’s authenticity and professionalism, making it a reliable proof of medical consultation for employers, schools, or other relevant parties.

Benefits of Using a Free Urgent Care Doctors Note PDF

A free urgent care doctor’s note PDF offers convenience, saving time and effort. It provides a professional, customizable document to validate absences for work or school, ensuring accessibility and efficiency.

Convenience and Accessibility

Free urgent care doctor’s note PDFs offer unparalleled convenience, allowing users to download and access essential documentation instantly. These templates eliminate the need for manual drafting, saving valuable time. With customizable fields, users can quickly fill in patient details, visit information, and medical reasons, ensuring accuracy. The accessibility of these PDFs is enhanced by their availability on multiple platforms, enabling easy downloads from various devices. Additionally, the ability to print or email the completed notes streamlines communication with employers or schools. This hassle-free solution is particularly beneficial for individuals requiring immediate proof of a medical visit, making it a practical choice for busy lifestyles.

Customization Options for Specific Needs

Free urgent care doctor’s note PDF templates are designed to accommodate a variety of situations, offering customization options to meet specific requirements. Users can easily modify fields to include patient details, visit dates, and medical reasons, ensuring the document aligns with individual circumstances. Templates often provide sections for diagnoses, treatments, and follow-up instructions, allowing for precise and relevant information. Additionally, some templates cater to particular needs, such as work absences or school excuses, making them versatile for different scenarios. This adaptability ensures the note serves its purpose effectively, whether for employment, education, or legal purposes, providing a tailored solution for each user’s needs.

How to Find and Download a Free Urgent Care Doctors Note Template

Find reliable templates online through trusted websites like Carepatron or similar platforms.
Search for “urgent care doctor’s note PDF” and download the template that best suits your needs.

Recommended Websites for Reliable Templates

Several websites offer reliable and free urgent care doctor’s note templates.
Carepatron, Template.net, and PDFfiller provide high-quality, customizable options.
These platforms ensure professionalism and compliance with medical standards.
Additionally, Google Docs and Microsoft Word templates are widely available
and can be easily edited to suit specific needs. Always verify the source
for authenticity to ensure the template meets legal requirements.

Steps to Download and Use the Template

To download and use an urgent care doctor’s note template, start by visiting
a reliable website like Carepatron or Template.net. Browse the available
templates and select one that matches your needs. Click the download button
to save the PDF or Word document to your device. Open the template in
a compatible program and fill in the required fields, such as patient details,
visit date, and medical information. Customize the content to reflect the
specific circumstances, ensuring accuracy and professionalism. Save the
completed document and print it if necessary. Finally, verify all information
for completeness before submitting it to employers, schools, or other
relevant parties. Regularly check for template updates to ensure compliance
with current standards.

How to Fill Out an Urgent Care Doctors Note Template

Start by entering the patient’s full name, date of birth, and contact information.
Include the date of the visit and details about the medical condition
or symptoms. Add the doctor’s name, clinic information,
and signature for authenticity. Specify the number of days
the patient needs to rest and any follow-up instructions.
Ensure all information is accurate and complete for professional use;

Essential Information to Include

When filling out an urgent care doctor’s note, include the patient’s full name, date of birth, and contact information.
Specify the date and time of the visit, along with the clinic’s name and address.
Detail the medical condition, symptoms, or diagnosis, and outline any treatments or medications prescribed.
Note any work or school restrictions and the duration of recovery.
Add follow-up instructions or referrals if necessary.
Finally, include the physician’s name, signature, and credentials to ensure authenticity.
This ensures the document is comprehensive and professional for official purposes.

Tips for Accurate and Professional Completion

Tips for Accurate and Professional Completion

To ensure accuracy, use clear and concise language when filling out the urgent care doctor’s note.
Customize the template to fit specific needs, such as work or school requirements.
Include the clinic’s official branding, like logos or letterhead, for professionalism.
Proofread for errors in dates, names, and medical details to avoid discrepancies.
Ensure the physician’s signature and credentials are legible and authentic.
Adhere to legal standards, maintaining patient confidentiality and avoiding false information.
Finally, save a digital copy for easy access and future reference.
These steps ensure the document is reliable, professional, and compliant with official requirements.

Common Uses of Urgent Care Doctors Notes

Urgent care doctor’s notes are primarily used to validate work absences or school excuses.
They provide official proof of medical visits, ensuring seamless communication between patients and employers or educational institutions.

Work-Related Absences

Urgent care doctor’s notes are frequently used to validate work-related absences,
ensuring employees can take necessary time off for medical reasons. These documents
provide employers with official proof of a legitimate health issue,
helping maintain trust and compliance with workplace policies. The notes typically
include details such as the date of the visit, diagnosis, and any
recommended work restrictions. By using a free PDF template, employees
can quickly obtain and submit the required documentation,
streamlining the process for both parties. This ensures minimal disruption
to work duties while addressing health concerns effectively.

School or College Excuses

Urgent care doctor’s notes are essential for students needing to validate absences
due to illness or injury. These documents serve as official excuses,
ensuring students avoid penalties for missing classes. The notes typically
include details such as the date of the visit, diagnosis, and confirmation
of recovery. Schools and colleges often require this documentation to
excuse absences, and a free PDF template makes it easy to provide
the necessary information promptly. This streamlined process helps
students maintain their academic standing while addressing their health
needs efficiently. The templates are customizable to fit specific school
or institutional requirements, ensuring legitimacy and clarity.

Legal Considerations for Using Doctors Notes

Using urgent care doctors notes requires ensuring authenticity and compliance
with legal standards. Forgery or misrepresentation can lead to legal consequences.

Authenticity and Validity Requirements

An urgent care doctor’s note must be authentic and valid to be accepted
by employers or schools. It should include official letterhead, a licensed
physician’s signature, and clear details about the patient’s visit. The note
must specify the date, diagnosis, and any recommended rest or treatment.
It should also be dated and signed, ensuring compliance with legal standards.
Digital templates must include security features to prevent forgery. Patients
should ensure the information is accurate and truthful to avoid legal
consequences. Proper documentation is essential for maintaining credibility
and ensuring the note’s validity for its intended purpose.

Patient Privacy and Confidentiality

Patient privacy and confidentiality are critical when using an urgent care doctor’s note PDF. All medical information must be handled in accordance with HIPAA regulations to protect patient data. The note should only include necessary details, avoiding sensitive personal information unless required. Clinics must ensure secure storage and transmission of documents. Patients should verify that downloaded templates comply with privacy standards. Sharing or disclosing medical information without consent is strictly prohibited; Proper measures, such as secure digital signatures and encrypted files, should be in place to safeguard confidentiality. Ensuring patient privacy maintains trust and adheres to legal and ethical medical practices.

An urgent care doctor’s note PDF offers a convenient and professional solution for documenting medical visits, ideal for work or school absences.

Final Thoughts on Urgent Care Doctors Note PDF Free

An urgent care doctor’s note PDF is a valuable resource for individuals needing proof of medical visits. It offers convenience, customization, and professionalism, making it ideal for work or school absences. The templates are readily available online, allowing users to download and print them effortlessly. They typically include sections for patient information, visit details, and doctor signatures, ensuring all necessary data is captured. This tool streamlines the process of documenting minor illnesses or injuries, providing a quick and efficient solution. By leveraging these free templates, individuals can manage their health-related documentation with ease and maintain professional communication with employers or educational institutions.

air compressor manual

Safety Guidelines for Air Compressor Operation

Always read the manual thoroughly before operating the air compressor․ Wear protective equipment like goggles and gloves․ Ensure proper ventilation and avoid overheating․ Regularly inspect hoses and connections for damage․ Never exceed the compressor’s rated pressure․ Keep the area clean and clear of flammable materials․

General Safety Precautions

Always read and follow the air compressor manual before operation․ Ensure proper installation in a well-ventilated area‚ away from flammable materials․ Regularly inspect hoses‚ connections‚ and components for damage or wear․ Never exceed the compressor’s maximum pressure rating․ Keep loose clothing and long hair tied back to avoid entanglement․ Avoid touching hot surfaces‚ as they can cause burns․ Ensure all valves and switches are functioning correctly before use․ Never operate the compressor in an enclosed space without proper ventilation to prevent carbon monoxide buildup․ Keep children and unauthorized individuals away from the equipment․ Always follow the manufacturer’s guidelines for operation and maintenance․

Personal Protective Equipment (PPE) Requirements

Wearing proper Personal Protective Equipment (PPE) is essential when operating an air compressor․ Always wear safety glasses or goggles to protect your eyes from debris or compressed air․ Use ear protection to prevent hearing damage from loud noises․ Gloves are recommended to prevent cuts and abrasions when handling equipment․ A dust mask or respirator may be necessary in dusty environments․ Ensure loose clothing and long hair are tied back to avoid entanglement with moving parts․ Steel-toe boots or sturdy footwear should be worn to protect feet from heavy objects․ Always follow the manufacturer’s PPE recommendations for specific tasks․ Proper PPE ensures a safer working environment and reduces the risk of injury․

Handling Compressed Air Safely

When working with compressed air‚ ensure all components are rated for the system’s maximum pressure․ Use properly rated hoses and fittings to prevent failure․ Avoid directing compressed air at people or exposed skin‚ as it can cause injury․ Never use compressed air for cleaning clothing or body parts․ Always check for leaks in hoses and connections before use․ Ensure the system is depressurized before performing maintenance․ Use approved tools for adjusting or servicing air-powered equipment․ Follow the manufacturer’s guidelines for operating pressure and flow rates․ Proper handling of compressed air ensures safe and efficient operation‚ reducing the risk of accidents and equipment damage․

Installation of the Air Compressor

Ensure the compressor is installed on a level‚ sturdy surface to prevent vibration issues․ Follow the manufacturer’s instructions for electrical connections and piping․

Site Preparation and Placement

Proper site preparation is crucial for safe and efficient air compressor operation․ Ensure the installation area is level‚ dry‚ and well-ventilated to prevent moisture buildup and reduce noise․ The surface must be sturdy enough to support the compressor’s weight and handle vibrations․ Keep the compressor away from flammable materials and direct sunlight․ Ensure there is adequate space around the unit for maintenance and easy access․ Follow manufacturer guidelines for placement to avoid operational issues and ensure compliance with safety standards․ Proper positioning also helps in maintaining optimal performance and extending the lifespan of the equipment․

Electrical Connections and Requirements

Ensure the air compressor is connected to a dedicated power supply with the correct voltage and amperage rating․ Always follow the manufacturer’s specifications to avoid electrical overload or damage․ Use high-quality cables and connectors to prevent power loss and ensure safe operation․ Install appropriate circuit breakers to handle the compressor’s startup surge․ Ground the unit properly to prevent electrical hazards․ If unsure‚ consult a licensed electrician to ensure compliance with local electrical codes․ Regularly inspect the wiring and connections for signs of wear or damage․ Proper electrical setup is essential for safe and efficient operation of the air compressor․

Initial Setup and Alignment

Before operating‚ ensure the air compressor is placed on a flat‚ stable surface and securely anchored․ Check the unit for damage during transportation and ensure all components are included․ Properly align the compressor and its accessories to ensure efficient operation; Follow the manufacturer’s instructions for unpacking and positioning‚ especially for large or heavy models․ Align the drive belts or direct drive systems to the recommended tension to avoid vibration․ Secure all bolts and connections tightly․ Allow the compressor to cool down completely before restarting after initial setup․ Proper alignment ensures optimal performance and reduces the risk of mechanical failure․ Always refer to the manual for specific alignment guidelines․

Operating the Air Compressor

Always follow the startup procedure and ensure proper ventilation․ Monitor pressure gauges and temperature levels during operation․ Keep the area clean and clear of debris․

Startup Procedure

Before starting the air compressor‚ ensure the manual has been read and understood․ Verify the compressor is installed on a flat‚ stable surface and all connections are secure․ Open all manual shutoff valves and ensure the pressure gauge reads zero․ Check for any leaks in hoses and connections․ Jog the starter to test the motor and ensure smooth operation․ Allow the compressor to build pressure gradually․ Once operational‚ monitor the pressure gauge and temperature levels․ Always start with an empty air tank for the first use․ If unusual noises or vibrations occur‚ stop the compressor immediately and investigate․

Monitoring During Operation

Continuously monitor the air compressor’s pressure gauge to ensure it operates within the recommended range․ Regularly check the temperature of the motor and components to prevent overheating․ Inspect hoses and connections for any signs of wear or leaks․ Listen for unusual noises or vibrations‚ which may indicate misalignment or imbalance․ Ensure the air filter is clean and free from debris to maintain airflow efficiency․ Periodically review the oil levels (if applicable) and top up as needed․ Keep the surrounding area clean and well-ventilated to prevent accumulation of dust or moisture․ If any irregularities are detected‚ stop the compressor and address the issue promptly․

Shutdown and Cool-Down

To safely shut down the air compressor‚ reduce the workload gradually and allow it to cool․ Turn off the power supply and engage the emergency stop if necessary․ Close the air intake valve to prevent sudden pressure drops․ Allow the compressor to cool naturally before servicing․ Never shut off the compressor abruptly‚ as this can cause damage․ Drain the moisture trap to remove accumulated condensate․ Ensure all pressure is released from the system before performing maintenance․ Regular cool-down periods help extend the life of the compressor and prevent thermal stress․ Always follow the manufacturer’s specific shutdown procedures outlined in the manual․

Maintenance and Service

Regularly inspect and replace air filters to ensure optimal performance․ Lubricate moving parts as specified in the manual․ Check coolant levels and top up if necessary․ Drain condensate from the tank daily to prevent rust․ Inspect hoses and belts for wear and replace them when damaged․ Schedule professional servicing annually to maintain efficiency and safety․ Always refer to the manufacturer’s guidelines for specific maintenance requirements․

Routine Maintenance Checks

Perform daily inspections of the air compressor to ensure smooth operation․ Check the oil levels and top them up as needed․ Inspect the air filters for cleanliness and replace them if dirty․ Ensure all hoses and connections are secure and free from leaks․ Monitor the temperature of the motor and compressor to prevent overheating․ Drain the condensate from the tank regularly to avoid rust buildup․ Check the pressure gauge to ensure it is within the recommended range․ Inspect the belts for wear and tear․ Clean the compressor and surrounding area to maintain efficiency․ Always refer to the manual for specific maintenance schedules and procedures․

Scheduled Service Intervals

Regular servicing is essential for optimal performance and longevity of the air compressor․ Replace the oil every 500 operating hours or as specified in the manual․ Change the air filters every 1‚000 hours to ensure clean air intake․ Inspect and replace the belts every 2‚000 hours or if signs of wear appear․ Check the pressure valves annually to ensure proper function․ Service the cooling system every 5‚000 hours to prevent overheating․ Follow the manufacturer’s recommendations for replacing seals and gaskets․ Schedule a professional inspection every 10‚000 hours for a thorough evaluation․ Always refer to the manual for specific service intervals tailored to your compressor model and usage․ Maintain a service log to track maintenance activities․

Storage and Long-Term Care

Proper storage and long-term care ensure the air compressor remains functional when not in use․ Store the unit in a dry‚ well-ventilated area away from direct sunlight․ Avoid extreme temperatures and humidity․ If storing for extended periods‚ drain moisture from the tank and disconnect the power supply․ Apply a rust-inhibiting coating to metal parts․ Cover the compressor with a breathable material to protect from dust․ For units with oil‚ follow the manual’s instructions for draining or sealing․ Check the compressor periodically during storage for any signs of damage or wear․ Always consult the manufacturer’s guidelines for specific storage recommendations․ Ensure all hoses and accessories are securely stored to prevent damage․

Troubleshooting Common Issues

Common air compressor issues include low pressure output‚ excessive noise‚ or motor overheating․ Check for air leaks‚ clogged filters‚ or malfunctioning valves․ If the motor overheats‚ ensure proper ventilation and reduce load․ For oil leaks‚ inspect gaskets and seals․ Always refer to the manual for diagnostic steps and solutions․ Regular maintenance can prevent many issues․ If problems persist‚ consult a professional or the manufacturer’s support team․ Always prioritize safety during troubleshooting․

Identifying Common Problems

Common air compressor issues include low pressure output‚ excessive noise‚ and motor overheating․ Low pressure may result from air leaks‚ clogged filters‚ or malfunctioning valves․ Noise can indicate loose parts or worn components․ Overheating often occurs due to poor ventilation or overloading․ Other issues include oil leaks‚ which may signal damaged gaskets or seals․ Regularly inspecting hoses‚ belts‚ and filters helps identify problems early․ Always refer to the manual for specific diagnostic procedures․ If issues persist‚ consult a professional or the manufacturer’s support team for assistance․ Remember‚ early detection and repair can prevent costly downtime and extend the compressor’s lifespan․

Diagnostic Techniques

Effective diagnostic techniques involve a systematic approach to identify issues․ Begin by reviewing the manual and understanding the compressor’s normal operation․ Perform a visual inspection of hoses‚ belts‚ and connections for wear or damage․ Use pressure gauges to check for drops or fluctuations․ Listen for unusual noises‚ such as grinding or hissing‚ which may indicate internal malfunctions․ Test thermal sensors to detect overheating․ For complex issues‚ utilize diagnostic tools like multimeters or pressure testers․ Always follow safety protocols when diagnosing electrical components․ Document findings and refer to the manual for troubleshooting charts․ If unsure‚ consult a certified technician to avoid further damage․ Regular diagnostics ensure optimal performance and longevity of the compressor․

Repair and Replacement Guidelines

Always refer to the manual for specific repair procedures․ Turn off the power and release pressure before starting any work․ For minor issues‚ replace worn or damaged parts like filters or hoses․ Lubricate moving parts as specified․ For major repairs‚ such as replacing the motor or compressor head‚ follow the manufacturer’s instructions․ Use genuine replacement parts to ensure compatibility and safety․ If unsure‚ contact a certified technician to avoid further damage․ Keep a record of all repairs and replacements for future reference․ Regular maintenance can prevent costly repairs and extend the compressor’s lifespan․ Always adhere to safety precautions when handling electrical or high-pressure components․

manual grease gun

A manual grease gun is a fundamental tool in lubrication, designed to deliver grease efficiently to mechanical components. Its simplicity, portability, and cost-effectiveness make it indispensable in various industries.

1.1 What is a Manual Grease Gun?

A manual grease gun is a hand-operated tool used to apply lubricating grease to mechanical components. It consists of a barrel to hold the grease cartridge, a plunger or piston, and a nozzle for dispensing. The gun is activated by a lever or pump mechanism, allowing precise control over grease flow. Its portability and simplicity make it ideal for various applications, from automotive maintenance to industrial machinery. The manual operation ensures reliability and ease of use in environments without access to power sources.

1.2 Importance of Grease Guns in Lubrication

Grease guns play a crucial role in lubrication by delivering grease precisely to mechanical components, reducing friction, and preventing wear and tear. They protect machinery from corrosion and ensure smooth operation. Regular use extends equipment lifespan, prevents overheating, and minimizes downtime. Grease guns are essential for maintaining industrial, automotive, and heavy-duty machinery, making them a cornerstone of maintenance routines across various industries.

Types of Manual Grease Guns

Manual grease guns are available in two primary types: lever-operated and pump/pistol grip models. Both designs facilitate precise grease application, catering to different user preferences and tasks.

2.1 Manual Grease Gun with Lever

The manual grease gun with a lever is a classic design, offering straightforward operation. It uses a lever mechanism to pressurize the grease, allowing for controlled dispensing. Suitable for low to medium-duty applications, this model is preferred for its simplicity and reliability. The lever design enables precise control over grease flow, making it ideal for small-scale lubrication tasks. Its robust construction ensures durability, while the ease of use makes it accessible for users of all skill levels.

2.2 Manual Grease Gun with Pump/Pistol Grip

The manual grease gun with a pump or pistol grip is a popular choice for its efficiency and ease of use. It features a pistol-like handle that allows for quick, repetitive pumping action, enabling faster grease dispensing compared to lever models. This design is ideal for applications requiring higher pressure and volume, making it suitable for automotive, industrial, and heavy-duty tasks. Its ergonomic grip reduces fatigue, while the pump mechanism ensures consistent lubrication delivery, catering to both small and large-scale operations effectively.

How to Load a Manual Grease Gun

Loading involves attaching a grease cartridge, ensuring it’s securely seated, and replacing any protective seals. Attach the nozzle, then prime by squeezing the lever to dispense grease.

3.1 Loading a Grease Cartridge

Loading a grease cartridge into a manual grease gun is straightforward. First, remove the nozzle and open the gun’s barrel. Insert the cartridge, ensuring it’s seated properly. Replace any protective caps or seals. Reattach the nozzle securely. This ensures the grease flows correctly during use. Proper loading is essential for efficient greasing and prevents waste or mess. Always refer to the manufacturer’s guide for specific instructions, as designs may vary slightly.

3.2 Priming the Grease Gun

Priming the grease gun ensures grease flows smoothly before use. Remove any air pockets by depressing the lever or trigger slowly until grease appears at the nozzle. Wipe excess with a clean rag. This step prevents dry starts and ensures proper lubrication. For cartridge models, priming aligns the piston and grease flow. Always prime after loading a new cartridge or storing the gun for extended periods. Proper priming guarantees efficient and effective grease application.

Using a Manual Grease Gun

Attach the nozzle, position it firmly on the grease fitting, and squeeze the lever or handle to dispense grease. Control the flow carefully to avoid over-lubrication.

4.1 Step-by-Step Guide to Dispensing Grease

First, ensure the grease gun is loaded and primed with the appropriate grease. Attach the nozzle securely to the grease fitting. Squeeze the lever or handle slowly and steadily to dispense grease. Monitor the flow to avoid over-lubrication. After applying, wipe off any excess grease with a clean cloth. Store the gun properly after use to maintain its functionality and prevent contamination.

4.2 Tips for Efficient Greasing

Always use the correct type of grease for your equipment to ensure optimal performance. Ensure the grease gun nozzle is clean and free from debris to prevent contamination. Apply grease in small, controlled bursts to avoid over-lubrication. Regularly inspect the grease fitting for damage or blockages. Store the grease gun upright to prevent grease from leaking. Keep a rag handy to wipe away excess grease. Properly prime the gun before use to ensure consistent grease flow. This ensures efficient and effective lubrication every time.

Maintenance and Cleaning

Regularly clean the grease gun to remove dirt and old grease. Store it in a dry place to prevent rust. Check for blockages and ensure proper function.

5.1 Cleaning the Grease Gun

Cleaning the grease gun is essential for maintaining its performance. Start by detaching the hose and removing any remaining grease. Use a clean cloth or solvent to wipe away dirt and old grease. Pay attention to the nozzle and trigger mechanism, as these areas are prone to clogs. Allow the gun to dry thoroughly before reloading. Regular cleaning prevents contamination and ensures smooth operation. Always inspect for blockages and wear to maintain optimal functionality.

5.2 Storing the Grease Gun Properly

Proper storage ensures the longevity of your manual grease gun. After cleaning, store it in an upright position to prevent grease leakage. Keep it in a clean, dry place, away from direct sunlight and extreme temperatures. Cover the nozzle with a plastic bag to protect it from dust. Regularly inspect the gun for damage or wear before storage. This practice helps maintain its functionality and prevents contamination, ensuring it remains ready for use when needed.

Safety Precautions

Always wear protective gloves and eyewear when using a manual grease gun. Avoid overpressurizing and ensure the area is clear of debris to prevent accidents and injuries.

6.1 Handling the Grease Gun Safely

When handling a manual grease gun, always maintain a firm grip and avoid touching moving parts. Wear protective eyewear and gloves to safeguard against grease splatters. Ensure the work area is clean and free from obstacles. Never aim the nozzle at people or sensitive surfaces. Store the gun upright in a dry place when not in use to prevent contamination and leakage. Proper handling ensures safe and efficient lubrication tasks.

6.2 Disposal of Used Grease and Cartridges

Properly dispose of used grease and cartridges to minimize environmental impact. Allow grease to harden before throwing it away in sealed containers. Do not pour grease down drains, as it can clog pipes and harm ecosystems. Recycle metal cartridges if possible, and ensure they are empty of residue. Always follow local regulations for hazardous waste disposal. This responsible practice helps protect the environment and maintains safety standards.

Benefits of Using a Manual Grease Gun

Manual grease guns are cost-effective, portable, and easy to use, making them ideal for lubrication tasks. They are reliable, energy-efficient, and suitable for various applications.

7.1 Cost-Effectiveness

Manual grease guns are a budget-friendly option for lubrication needs. They eliminate the expense of compressed air or electricity required by pneumatic or electric models. Their durability and long lifespan reduce replacement costs. Additionally, manual grease guns often come with affordable replacement cartridges, making them a practical choice for both small-scale and industrial applications. This cost-effectiveness ensures they remain a popular tool for many professionals and DIY enthusiasts.

7.2 Portability and Ease of Use

Manual grease guns are lightweight and compact, making them easy to carry and use in various settings. Their straightforward design allows for intuitive operation, requiring minimal training. The absence of external power sources ensures they can be used anywhere, without relying on electricity or compressed air.

This portability and simplicity make manual grease guns ideal for fieldwork, DIY projects, and small workshops. They are also less prone to mechanical failure due to their fewer moving parts, enhancing reliability for everyday use.

Common Mistakes to Avoid

  • Overfilling the grease gun, which can lead to leakage and waste.
  • Using the wrong type of grease for specific applications.
  • Not priming the gun properly before use, causing air pockets.

8.1 Overfilling the Grease Gun

Overfilling a manual grease gun is a common mistake that can cause grease to leak out during use. This not only wastes grease but also creates a messy cleanup. Additionally, excess grease can interfere with the gun’s mechanism, leading to poor performance. It is important to fill the gun only up to the recommended level, ensuring proper function and minimizing waste. Always refer to the manufacturer’s guidelines for the correct filling procedure.

8.2 Using the Wrong Type of Grease

Using the wrong type of grease in a manual grease gun can lead to poor lubrication and potential damage to equipment. Grease compatibility with the gun’s seals and the application is crucial. Incorrect grease may cause leakage, clogging, or insufficient lubrication, leading to equipment failure. Always check the manufacturer’s recommendations for compatible grease types to ensure optimal performance and avoid costly repairs. Using the right grease ensures proper functionality and extends the lifespan of both the grease gun and the machinery it services.

Troubleshooting Common Issues

Common issues with manual grease guns include clogged nozzles, air leaks, and grease not dispensing properly. Regular maintenance and proper loading can prevent these problems.

9.1 Grease Not Dispensing Properly

If grease isn’t dispensing, check for blockages in the nozzle or tube. Ensure the gun is properly primed and loaded. Air leaks or incorrect grease types can also cause issues. Regular cleaning and using the right grease consistency helps maintain smooth operation. If problems persist, disassemble and inspect internal components for damage or obstructions. Proper maintenance can prevent such issues and ensure effective lubrication.

9.2 Air Leaks in the Grease Gun

Air leaks in a manual grease gun can occur due to loose connections, worn seals, or improper cartridge loading. This reduces pressure, leading to inefficient grease delivery. Inspect all connections, tighten any loose parts, and replace damaged seals. Ensure the cartridge is properly seated and primed. If leaks persist, check for blockages or internal damage. Addressing air leaks promptly prevents grease waste and maintains optimal lubrication performance, ensuring machinery operates smoothly and effectively.

Manual grease guns are essential tools for efficient lubrication, offering simplicity, portability, and cost-effectiveness. By understanding their types, proper loading, and maintenance, users can maximize their performance. Regular cleaning, safe handling, and avoiding common mistakes ensure longevity and reliability. Whether for industrial or DIY use, manual grease guns remain a vital asset for keeping machinery well-lubricated and functioning smoothly. Proper care and usage will extend their lifespan, making them a dependable choice for years to come.

life guide impocoolmom

Welcome to the ImpoCoolMom Life Guide! Your ultimate resource for mastering time management, productivity hacks, self-care, and more. Empowering moms to thrive in all aspects of life.

Time Management for Busy Moms

Mastering time management is essential for busy moms to balance family, work, and personal life. Learn to prioritize tasks, create realistic schedules, and use tools to stay organized and efficient.

The Importance of Time Management

Effective time management is crucial for balancing responsibilities, reducing stress, and achieving personal goals. By organizing tasks and prioritizing, moms can maximize productivity, ensuring quality time for family and personal growth. Implementing tools like calendars and task lists helps maintain focus and avoid overwhelm. Additionally, leveraging technology, such as setting timers or using search tools efficiently, can streamline daily routines. Mastering time management creates a sense of control, allowing moms to thrive in their roles while nurturing their well-being and relationships.

Prioritizing Tasks Effectively

Prioritizing tasks is essential for maximizing productivity and reducing overwhelm. Start by identifying what needs immediate attention and what can be scheduled later. Use tools like the Eisenhower Matrix to categorize tasks by urgency and importance. Break larger tasks into smaller, manageable steps to avoid feeling overwhelmed. Focus on completing high-priority tasks first, and avoid multitasking, which can decrease efficiency. By organizing your tasks thoughtfully, you can achieve more in less time, creating space for both family and personal goals. Effective prioritization helps maintain balance and reduces stress in a busy mom’s life.

Productivity Hacks

Discover essential productivity hacks to streamline your day. Use Google’s search tabs and specific functions to find information quickly. Set timers and apply advanced search techniques to boost efficiency and save time for what matters most.

Using Google Search Efficiently

Maximize your efficiency with Google search tips tailored for busy moms. Use the search tabs (Web, Image, News) to narrow results. Set timers by typing “set timer for” and utilize advanced techniques like the vertical bar (|) for “OR” searches or a minus sign (-) to exclude terms. These tricks help you find exactly what you need quickly, saving precious time for more important tasks. Streamline your routine with these simple yet powerful Google hacks designed to make your life easier and more productive.

Self-Care Tips

Discover essential self-care rituals to recharge and maintain balance. Learn quick, effective ways to prioritize your well-being without compromising your busy schedule. Empowering moms to thrive.

Quick Self-Care Rituals

Busy moms can benefit from quick self-care rituals that fit into a hectic schedule. Start with deep breathing exercises or a 5-minute meditation session to refresh your mind. Use a face mask or moisturize while your kids play. Even a short walk outside or a warm bath can recharge your energy. Prioritize small moments of self-care to maintain balance and reduce stress. These rituals are simple, effective, and essential for your well-being, ensuring you stay energized and focused throughout the day.

Household Organization Ideas

Transform your home with practical organization strategies. Use storage solutions, labels, and routines to maintain order. Create a clutter-free space that promotes efficiency and harmony for your family.

Decluttering Your Space

Decluttering your space is essential for a stress-free and organized home. Start by sorting items into categories: keep, donate, or discard. Focus on high-traffic areas first, like kitchens and living rooms. Use storage bins and labels to keep belongings accessible yet out of sight. Schedule regular decluttering sessions to maintain order. Involve the whole family to teach kids the importance of tidiness. A clutter-free environment boosts productivity and mental well-being, creating a peaceful haven for everyone. Make it a habit to let go of unused items and embrace simplicity for a more efficient lifestyle.

Parenting Tips

Effective communication is key to raising confident, empathetic children. Practice active listening, set clear boundaries, and encourage independence. Positive reinforcement fosters resilience and a strong parent-child bond.

Effective Communication with Kids

Effective communication with children fosters trust and understanding. Practice active listening by giving your full attention and validating their feelings. Use clear, simple language to ensure they grasp your message. Encourage open dialogue by asking open-ended questions and allowing them to express themselves freely. Positive reinforcement, such as praising their efforts, builds confidence. Set boundaries while explaining the reasons behind them. Stay patient and consistent, even in challenging moments. These strategies help create a supportive environment where your child feels heard and valued, promoting healthy emotional development and stronger family relationships.

Financial Management

Mastering financial management helps families thrive. Track expenses, set budgets, and prioritize spending. Automate savings and use budgeting apps to stay on top of your finances effortlessly.

Budgeting for the Family

Budgeting is essential for managing household finances effectively. Start by assessing your income and expenses to create a realistic plan. Categorize needs, wants, and savings to allocate resources wisely. Use the 50/30/20 rule: 50% for necessities, 30% for discretionary spending, and 20% for saving and debt repayment. Automate savings and bill payments to stay consistent. Regularly review and adjust your budget to reflect changing priorities. Consider using budgeting apps like Mint or You Need A Budget (YNAB) for better tracking. Teaching kids about budgeting can also foster financial literacy from a young age, ensuring a secure future.

Building Strong Relationships

Strong relationships are built on communication, empathy, and shared values. Prioritize quality time with loved ones, fostering trust and understanding. Schedule regular date nights and family bonding activities to strengthen connections and create lasting memories.

Nurturing Your Partnership

Nurturing your partnership is essential for a fulfilling relationship. Communicate openly, listen actively, and show appreciation daily. Schedule regular date nights to reconnect and strengthen your bond. Small gestures, like surprise gifts or heartfelt notes, can reignite love and trust. Resolve conflicts calmly and focus on understanding each other’s perspectives. Shared goals and mutual respect create a foundation for long-term harmony. Prioritize quality time together, fostering intimacy and emotional connection. A strong partnership is built on effort, empathy, and commitment, ensuring a lasting and joyful relationship.

Personal Development

Continuous learning and self-improvement are key to personal growth. Set goals, practice self-reflection, and embrace lifelong learning to evolve and thrive. Use tools like Google efficiently to broaden knowledge and stay inspired.

Continuous Learning and Growth

Embrace lifelong learning to stay inspired and adaptable. Set personal goals, explore new interests, and invest in self-improvement. Utilize online resources like Google to discover courses, tutorials, and articles. Prioritize self-reflection to identify growth areas. Incorporate short, daily learning sessions into your routine for consistency. Leverage technology, such as educational apps and podcasts, to make learning efficient. Engage in communities or forums to exchange ideas and stay motivated. Continuous growth fosters confidence, resilience, and a fulfilling life. By prioritizing learning, you not only evolve personally but also set a positive example for your family.

Leverage technology to streamline your life. Use digital calendars for scheduling, task management apps for organization, and educational apps for continuous learning. These tools enhance efficiency and reduce stress, helping you stay connected and productive in today’s fast-paced world.

Technology and Tools

Leveraging Technology for Efficiency

Technology is a powerful ally for modern moms. Tools like digital calendars and task management apps help organize schedules and reminders. Google Search features, such as tabs and specific query tips, enable quick access to information. Setting timers and using advanced search options save time. Apps for meal planning, budget tracking, and educational resources simplify daily tasks. By embracing these tools, moms can streamline routines, reduce stress, and focus on what matters most. The ImpoCoolMom Life Guide highlights how technology can be a game-changer, making life more efficient and enjoyable.